Beat the Chill with a FREE Crochet Hat Pattern for Your Toddler Girl!
Hello fellow hookers! Is there anything sweeter than a little girl bundled up in a handmade hat, her cheeks rosy from playing outside? I think not! As the days get shorter and the temperatures start to drop, my needles (or rather, hooks!) start itching to create some warm and cozy gear. And today, I’m sharing the love with you all with a Free crochet hat pattern for toddler girl!
This hat is designed to fit a toddler girl (approximately 1-3 years old), but you can easily adjust the size by adding or subtracting rows. We’ll be using basic crochet stitches, making it a perfect project for beginners looking to practice their skills. Plus, I’m ditching the long written instructions (sometimes overwhelming!) and offering you the patterns in the form of crochet diagrams!
Why Crochet Diagrams?
I find crochet diagrams incredibly intuitive! They provide a visual representation of each stitch and row, making it easier to follow along, especially when you’re dealing with repetitive patterns. They’re like a little crochet map guiding you to the finish line! So, let’s dive in!
Materials You’ll Need:
- Worsted weight yarn in your favorite color(s) (approximately 100 yards)
- Crochet hook size H/8 (5.0 mm)
- Scissors
- Yarn needle for weaving in ends
- Optional: Pom-pom, buttons, or other embellishments
Free Crochet Hat Pattern for Toddler Girl – Crochet Diagrams!
I’m offering you a few options for different stitch patterns. Feel free to mix and match or choose the one that appeals to you the most! All these diagrams assume you will use a magic circle or adjustable ring to start. If you are not comfortable with that start, you can start with a chain of 3, slip stitch to join, and then work all stitches into that central ring.
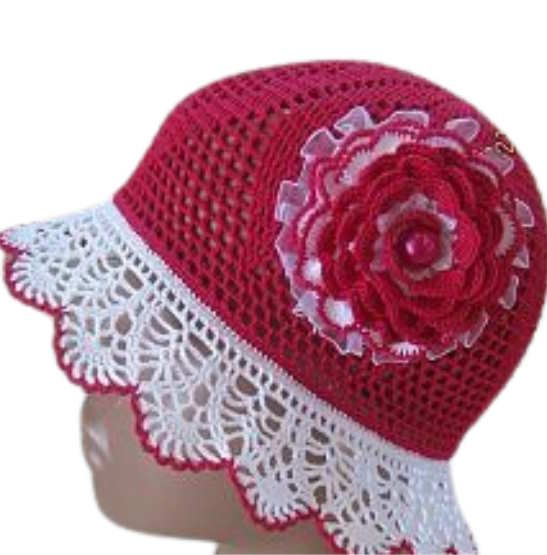
1.Vintage Charm: FREE Filet Crochet Hat Pattern for Your Toddler Girl!
Add a touch of vintage elegance to your little one’s wardrobe with this stunning free crochet hat pattern for toddler girl! Inspired by classic designs, this hat features a delicate filet crochet mesh body in a beautiful raspberry red, paired with a contrasting white scalloped brim that adds a whimsical, playful touch. The hat is further embellished with a handmade crochet flower, adorned with a pearl bead, making it a truly special piece.

Tips for reading the diagram above:
Common crochet diagram conventions:
- Circles (or dots): These represent chain stitches (ch).
- “T” with a slash through it: This represents a double crochet stitch (dc). The number of slashes can indicate different treble stitches, but here it seems just to be standard dc.
- “T” without a slash: I believe these represent single crochet (sc).
- Upside-down “U” shapes (looks like an arch): These represent slip stitches (sl st).
- Arrows: Indicate the direction of work
- Numbers inside shapes: Usually indicates how many stitches should be done into that stitch.
- Fan-like shapes: likely represent a cluster stitch or a shell stitch, where multiple stitches are worked into the same chain space or stitch.
- Triangles facing upwards: Looks like a picot or a cluster.
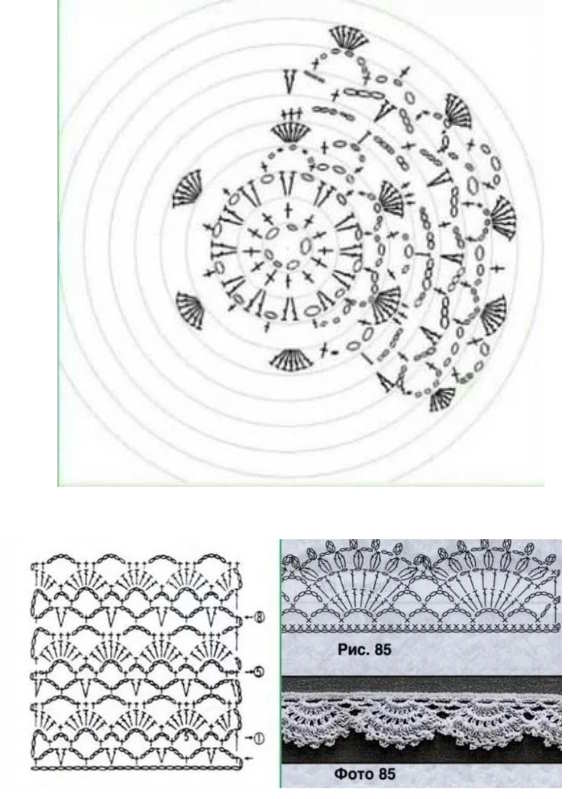
Diagram Sections: A Closer Look
This pattern actually presents a few different diagrams, each showing a different part of the hat:
- Filet Mesh (Top Diagram labeled “схема 70 в”): This diagram illustrates the filet mesh that forms the main body of the hat. Look closely: you’ll see rows of “T”s (double crochet) separated by spaces of “O”s (chain stitches). The diagram shows how to alternate rows of double crochet and chain spaces, creating the open, airy mesh.
- The Flower Center (Diagram labeled “схема 70”): This diagram shows the construction of the gorgeous crochet flower that embellishes the hat. Start from the center (usually indicated by a magic circle or a chain circle), and work outwards following the symbols. The flower starts with ten cross stitches, then develops into the shape that is shown.
- Scalloped Edge (Bottom Diagram): These diagrams showcase the scalloped edge. Follow these diagrams to make your hat brim.
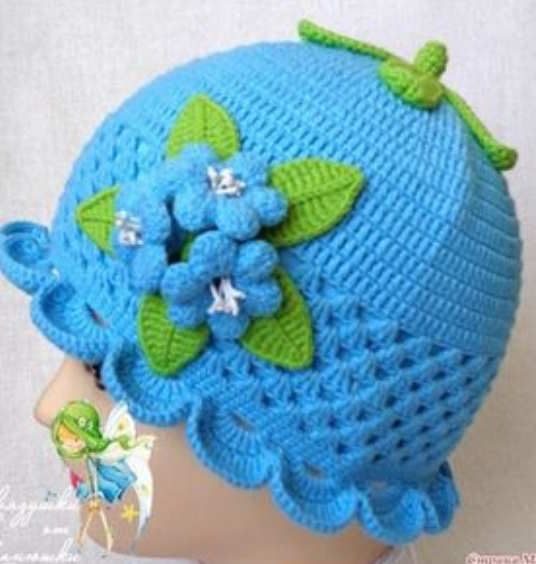
2. Charming Blue Hat
Alright, crochet enthusiasts, let’s get our hooks ready for this delightful blue hat adorned with crochet flowers! As promised, we’ll focus specifically on deciphering the symbols in the diagram provided, so you can confidently create this adorable free crochet hat pattern for your toddler girl.
Symbol Spotlight: What’s Unique to This Pattern?
While many symbols remain the same, let’s focus on what’s specific to this pattern’s diagrams:
- Dots (•) arranged in a circle: Definitely chain stitches (ch). It forms a magic circle where each row begins.
- “T” with a slash through it: This represents a double crochet stitch (dc). The number of slashes can indicate different treble stitches, but here it seems just to be standard dc.
- Small black line with 2 diagonal lines: This represents a double crochet.
- Small black line with an upside down U connecting to the next stitch: This represents a front post double crochet (FPdc), these give the hat texture.
- Lines that come together in a point: These are likely to indicate a decrease in stitch count, working the stitches together to create a smaller overall size.
- Plus Sign or “x”: Indicates a single crochet stitch.
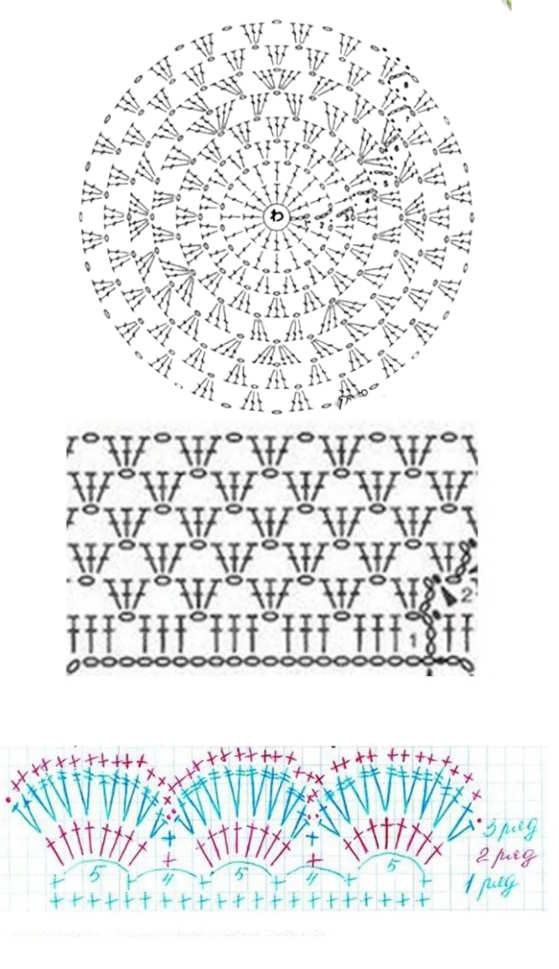
Diagram Breakdown: Hat Body and Brim
- Round Diagram (Top): This diagram illustrates the main body of the hat, which uses the double and front post double crochets to give it some texture. This diagram starts in a circle and grows outwards to create the top part of the hat. The diagram featured is a bit different to the hat picture, the diagram provides an entire lace hat, while the hat picture shows a solid crochet circle.
- Middle Diagram (Rows): The middle diagram illustrates the stitch pattern for the body of the hat, the top half are double crochet stitches, the bottom half are front post double crochet, meaning double crochets are looped around the double crochet in the previous row. This also shows where to add the pattern of chaining in the brim, by including single crochets.
- Brim Diagram (Bottom): A great example of how to read these diagrams! Follow the red stitches, then follow the blue stitches. It shows the arches you will be creating for the brim, by creating double and single crochets.
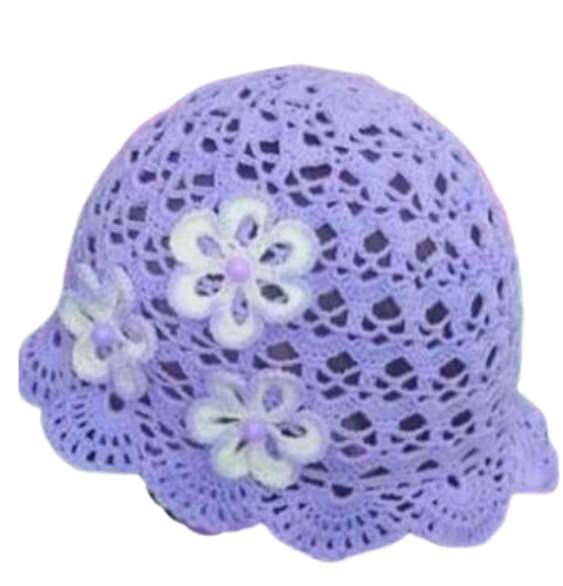
Free crochet pattern for a lace girls hat
Let’s set our sights on this delicate lavender hat, perfect for adding a touch of whimsical charm to any little girl’s outfit. As before, our focus is solely on deciphering the symbols in the provided diagrams to make it a great free crochet hat pattern for your toddler girl!
Key Symbol Spotlight: What’s Important Here?
This pattern uses many standard crochet symbols, but a few stand out in terms of how they’re used:
- Dots (•): As usual, chain stitches (ch). Crucial for creating the lacy spaces.
- “T” with a slash through it: Double crochet stitch (dc). The main stitch building the hat.
- Fans with small chains: this likely a shell stitch, indicating multiple stitches in the same location.
- Pluses with dots in the center: Indication of joining the rows together to close the hat
Decoding the Diagrams: Hat Body and Edging
- Circular Diagram (Top): This diagram illustrates the crown of the hat, worked in the round. You will start in the center and follow each stitch. Likely uses double stitches and chain stitches.
- Linear diagrams (bottom left): This is showing you the pattern of stitches around the body of the hat, including shells of double crochets, and shell of chains that create the body.
- Detail Diagram (bottom right): This diagram shows a shell stitch.
Crochet the Flower in the Hat:
Flower Center:
- Magic ring, ch3 (counts as dc), 15 dc into ring, sl st to top of ch3. (16 dc) Fasten off.
Petal Base:
- Join new color in any st, ch3 (counts as dc), ch3, dc in same st. ch3, skip 1 st, dc in next st, ch3, dc in same st. Repeat * 6 times. Ch3, sl st to top of ch3.
Petals:
- Ch3 (counts as dc), 7 dc in 1st dc. * 6 dc across next vertical dc, sc in skipped st of round 2, skip next ch-3 space, 6 dc across next vertical dc. 8 dc in next ch-3 space.* Repeat * 6 times. 6 dc across next vertical dc, sc in skipped st of round 2, skip next ch-3 space, 6 dc across next vertical dc. Sl st to top of ch3. Fasten off.
Leaves:
- Join green in any ch-3 space from round 2. (sc, ch1, 3dc, tr, ch3, sl st into 3rd ch from hook, tr, 3dc, ch1, sc) in same space. ch3, (sc, ch1, 3dc, tr, ch3, sl st into 3rd ch from hook, tr, 3dc, ch1, sc) in next space. Repeat * 6 times. ch3, sl st to first sc. Fasten off.
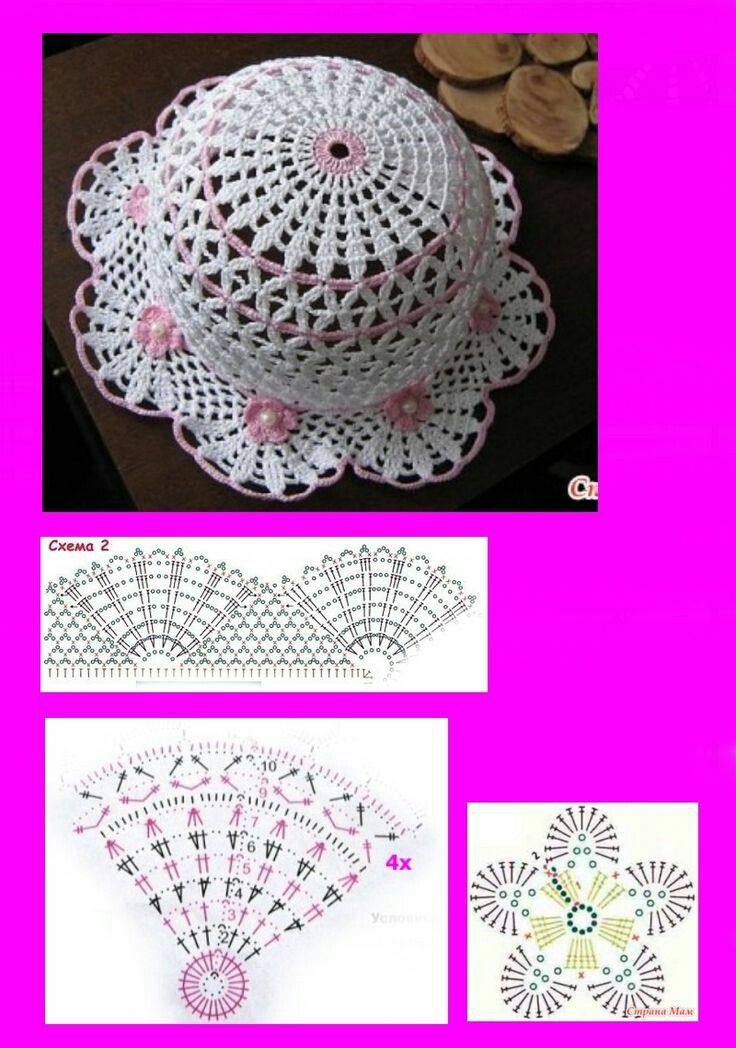
Sweet Blossoms: Lace Crochet Hat for Girls with a Brim
Are you ready to make something absolutely precious? Let’s dissect the diagram for this darling white hat with a pink floral trim – the perfect free lace hat pattern for little girls.
Symbol Decoding: Focusing on What’s Key
Here’s what we need to pay special attention to in this diagram:
- Circles (•): Chains stitches (ch). You know the drill – essential for the lace and spaces.
- “T” with a slash through it: Double crochet (dc). A workhorse stitch in this pattern!
- The V/ Inverted V: Most likely double crochet two together.
- The small fan lines: Shell Stitch.
Diagram Breakdown: Layers of Loveliness
- Top image (brim diagram): This gives you the fan shape of the brim, so you can make the whole brim.
- Image above the flower: This shows you how to crochet the flower pattern.
Decoding the Flower
- The flower consists of what looks like 2 petals being chained together, and then connected to single crochet in an opening.
Reading the Crochet Diagrams: A Quick Guide
Understanding crochet diagrams is easier than you think! Here’s a breakdown:
- Circles: Usually represent chain stitches.
- Plus Sign or “x”: Indicates a single crochet stitch.
- “T” shape: Represents a double crochet stitch. A shorter “T” can be a half double crochet.
- Open Circles or Ovals: May represent slip stitches.
- Arrows: Indicate the direction in which the rows are worked.
- Numbers: Often indicate the number of stitches in a round.
- Asterisks (*) or Brackets [ ]: Indicate sections of the pattern that are repeated.
Essentially, you follow the diagram stitch by stitch, round by round. The symbols tell you what stitch to make, and their placement shows you where to make it!
Putting It All Together:
- Start with the Magic Circle/Adjustable Ring (or Chain 3, Slip Stitch to Join). This forms the center of your hat.
- Follow the Diagram: Start from the center and work your way outwards, round by round. Make sure to count your stitches in each round to ensure your increases are correct.
- Increase Rounds: The diagrams show you how to increase your stitches evenly in the beginning rounds to create the crown of the hat. Keep increasing until the hat reaches the desired diameter for the top of your toddler’s head.
- Straight Rounds: Once you’ve reached the desired diameter, continue working in the same stitch pattern without increasing. This will create the body of the hat.
- Brim (if using): For the ribbed brim in Pattern Option 2, you’ll be working Half Double Crochet in the Back Loop Only (BLO) for several rows. This creates a textured, stretchy brim.
- Finishing: Once the hat reaches the desired length, fasten off your yarn and weave in all loose ends.
- Embellishments (optional): Add a pom-pom, buttons, or any other embellishments you like!
Tips and Tricks:
- Gauge: While this pattern is forgiving, checking your gauge can help ensure the hat fits your toddler perfectly. Crochet a small swatch using the yarn and hook you plan to use, and measure how many stitches and rows you get per inch.
- Adjusting Size: To make the hat bigger or smaller, add or subtract rows in the straight section of the hat. You may also need to adjust the number of increase rounds depending on your gauge.
- Practice: Don’t be afraid to frog (rip out) your work if you make a mistake! Crocheting is all about learning and experimenting.
- Have Fun! The most important thing is to enjoy the process and create something beautiful and cozy for your little one.