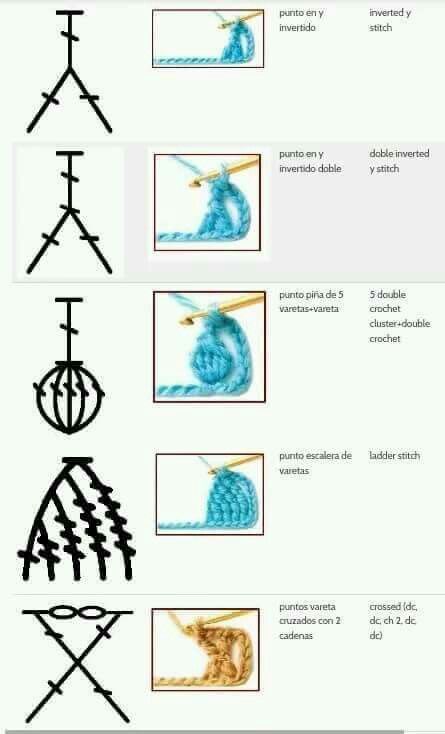
What are Crochet Symbols and Diagrams?
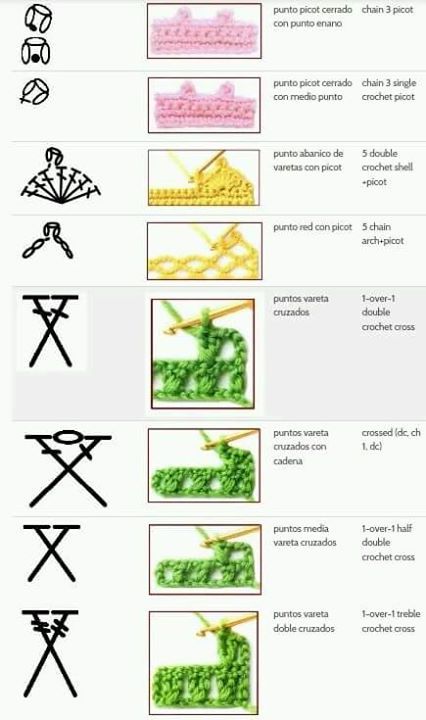
- Symbols: Think of them as a universal visual language for crochet stitches. Each basic stitch (and many complex ones) has a corresponding symbol.
- Diagrams (or Charts): These are drawings that use the symbols to map out a crochet pattern. Instead of reading rows of text like “sc in next st, 2 sc in next st,” you see the symbols arranged exactly how you should crochet them.
Why Use Diagrams?
- Visual Clarity: You can see exactly where each stitch goes in relation to the others. This is fantastic for lace, motifs, and complex stitch patterns.
- Language Barrier Buster: Symbols are mostly standardized internationally. Someone who doesn’t speak English can often follow a diagram from an English pattern, and vice-versa. (Note: There can be minor regional variations, but core symbols are quite consistent).
- Structure Overview: Diagrams give you an immediate visual sense of the finished piece’s structure or the pattern repeat.
- Error Checking: It’s often easier to compare your physical work to the diagram to see if you’ve gone wrong.
Common Crochet Symbols (US Terms Focus)
While there are many symbols, here are some of the most fundamental ones you’ll encounter. Always check the pattern’s key/legend first, as slight variations exist.
- Chain Stitch (ch): Usually an oval or an open circle (O).
- Slip Stitch (sl st): A solid dot (●) or sometimes a small filled arc. Used for joining rounds, moving across stitches without adding height, or finishing off.
- Single Crochet (sc): An ‘x‘ or sometimes a plus sign ‘+‘. (Note: This symbol often represents a UK Double Crochet).
- Half Double Crochet (hdc): A ‘T‘ shape. (Note: This symbol often represents a UK Half Treble Crochet).
- Double Crochet (dc): A ‘T‘ with one horizontal bar across the middle of the vertical stem (like Ŧ). (Note: This symbol often represents a UK Treble Crochet).
- Treble Crochet (tr): A ‘T‘ with two horizontal bars across the middle of the vertical stem. (Note: This symbol often represents a UK Double Treble Crochet).
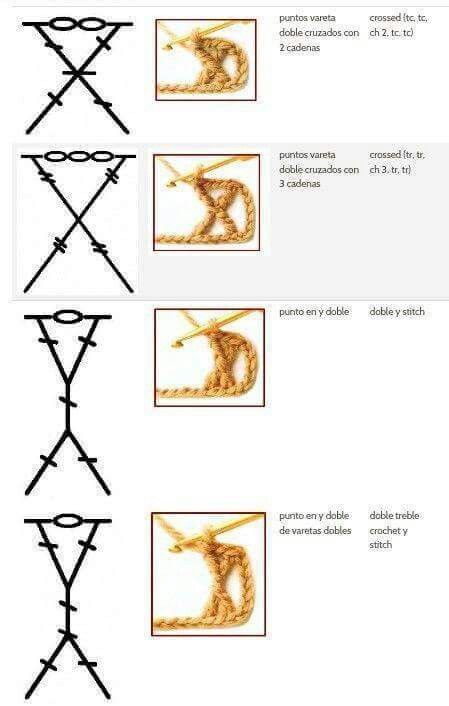
- (Continuing the pattern): Longer stitches like Double Treble (dtr), Triple Treble (trtr) add more bars to the ‘T’ stem.
- Magic Ring / Adjustable Ring: Often shown as a spiral or a circle with ‘MR’ or ‘MC’ inside, with the first round of stitches worked into it.
How to Read a Crochet Diagram
- Find the Key/Legend: THIS IS THE MOST IMPORTANT STEP! Every good diagram pattern will include a key that explicitly tells you what each symbol in that specific pattern means. It will also usually specify if US or UK terms are being used for any accompanying text.
- Identify the Starting Point:
- Working in Rounds (e.g., granny squares, mandalas, amigurumi bases): The start is usually in the center. You’ll often see a chain loop (a series of ‘O’ symbols joined by a slip stitch ‘●’) or a magic ring symbol. Work proceeds outwards in counter-clockwise circles (for right-handers).
- Working in Rows (e.g., scarves, blankets): The start is usually at the bottom. You begin with a foundation chain (a row of ‘O’ symbols).
- Follow the Flow:
- Rounds: Each round is numbered. Follow the symbols around the circle, usually counter-clockwise. A slip stitch symbol (●) will typically show where to join the end of the round to the beginning. The start of the next round will build upon that join point, often starting with turning chains.
- Rows: Rows are worked back and forth.
- Row 1 is usually read from right to left (for right-handers).
- Row 2 is usually read from left to right.
- Row 3 from right to left, and so on.
- Odd-numbered rows go one way, even-numbered rows go the other. Some diagrams include arrows to help.
- Each row typically begins with turning chains (represented by ‘O’ symbols stacked vertically). These bring the yarn up to the correct height for the stitches in that row (e.g., 1 ch for sc, 3 ch for dc). These turning chains often count as the first stitch of the row, which the diagram will show.
- Understand Stitch Placement: This is where diagrams shine! Look at the base of the symbol.
- If it connects to the top of a stitch symbol from the row/round below, you work into that stitch.
- If it connects to a chain symbol (‘O’) in a chain space from the row/round below, you work into that chain space.
- If multiple symbols originate from the same point below, you work multiple stitches into that same stitch or space (an increase).
- If multiple symbols join together at the top but originate from different stitches below, it represents a decrease.
- Look for Repeats: Patterns often have repeating sections. These might be indicated by:
- Brackets [ ] or **Asterisks ***
- Different colors or shaded areas
- Accompanying text like “Repeat from * to *” or “Repeat section in brackets X times.”
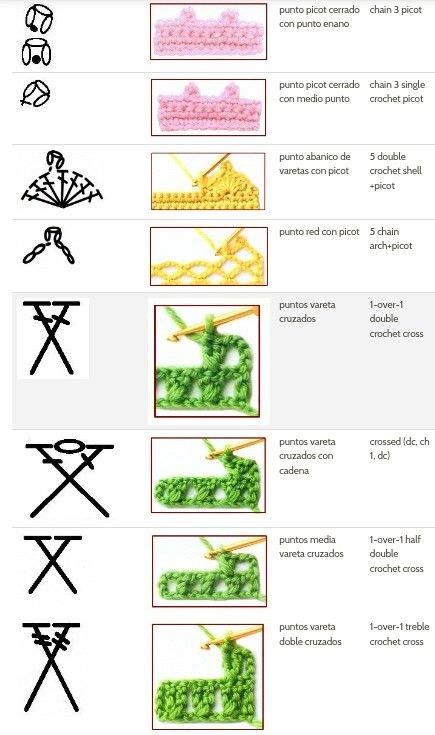
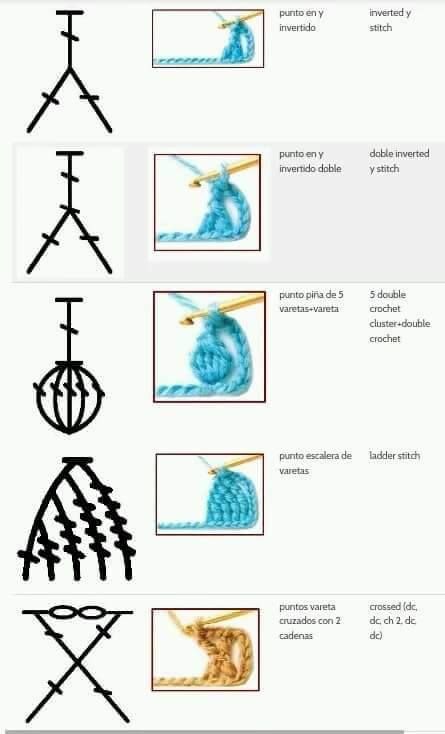
- Note Special Instructions: Sometimes symbols represent clusters (like puffs, bobbles, popcorns) or special techniques (like front post/back post stitches). These will always be defined in the key. Color changes might also be noted on the diagram or in accompanying text.
Tips for Success:
- Start Simple: Choose patterns with basic diagrams first, like granny squares or simple motifs.
- Print it Out: Having a physical copy you can mark up is helpful.
- Use a Ruler/Sticky Note: Place it under the row/round you are currently working on to keep your place.
- Count Your Stitches: Periodically count the stitches in your physical work and compare them to the number of symbols in that section of the diagram.
- Cross Off Rows/Rounds: Mark off sections as you complete them on your printed chart.
- Trust the Visual: Remember, the diagram shows where things go. If a symbol is placed in a chain space, work into the chain space, even if written instructions sometimes simplify this.
- Practice! Like any skill, it gets much easier with practice.
Crochet Symbols Glossary from all over the world, Russian, Portuguese, English, Japanese, Spanish and more.
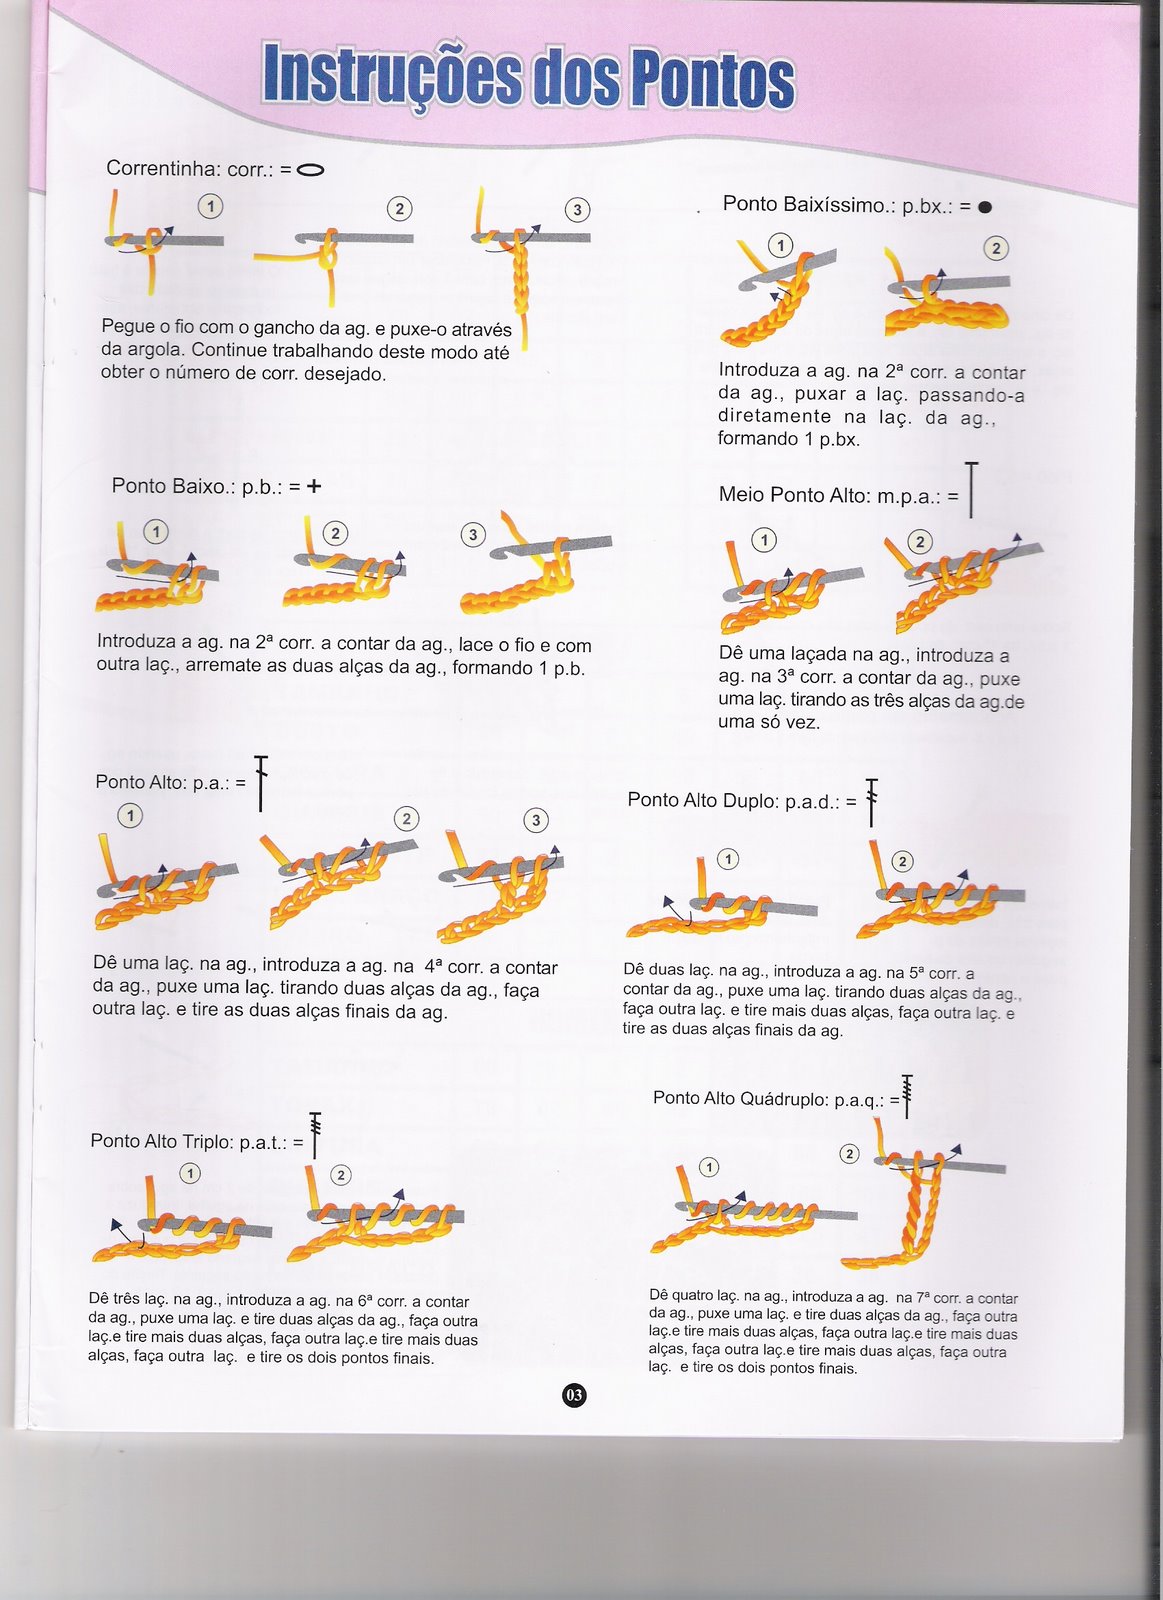
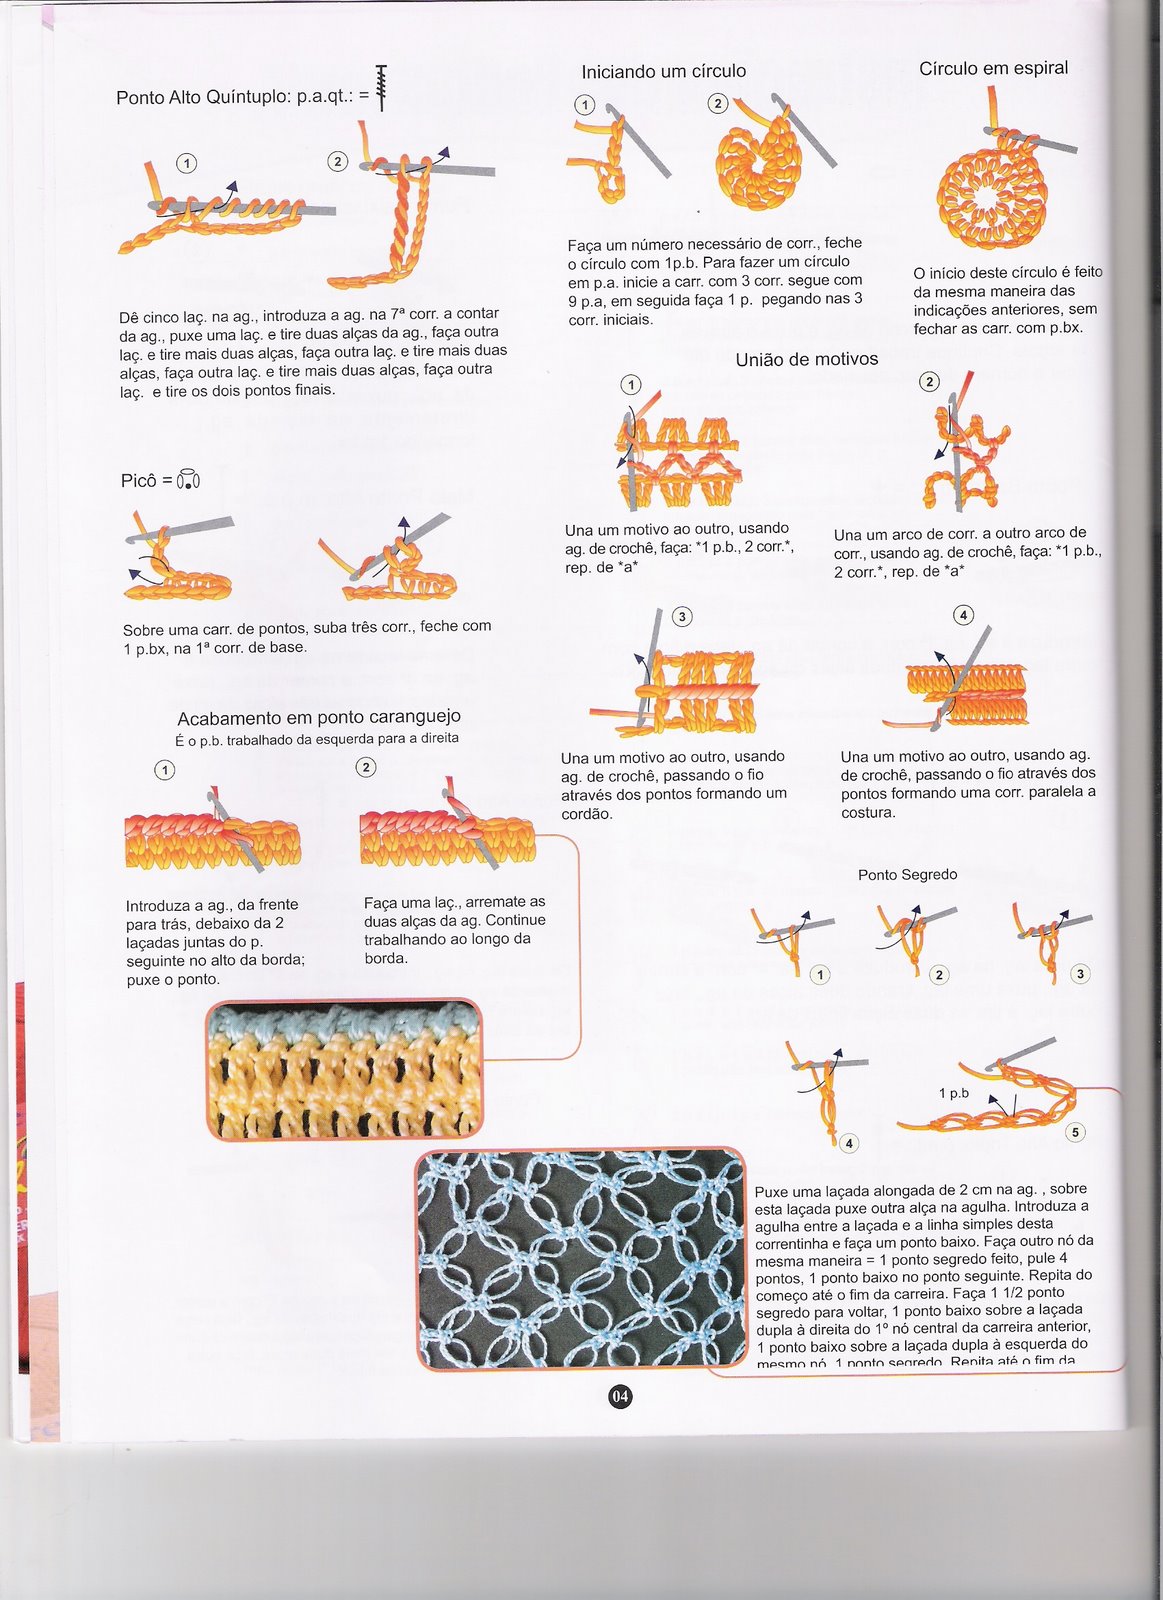
Portuguese Crochet Symbols:
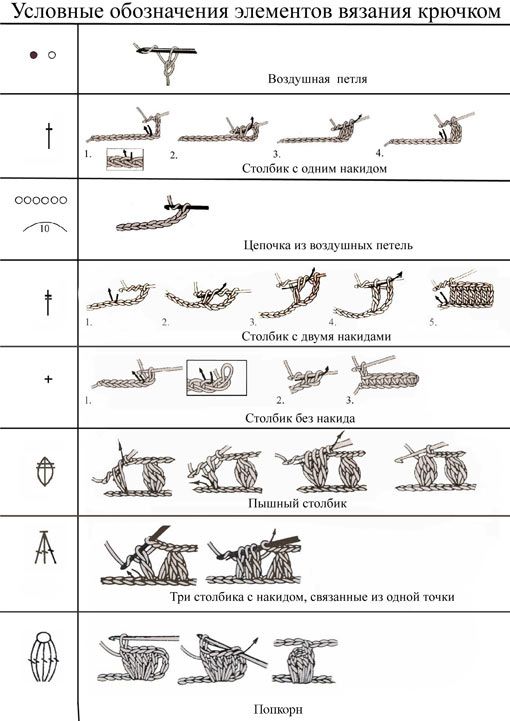
Russian Crochet Symbols:
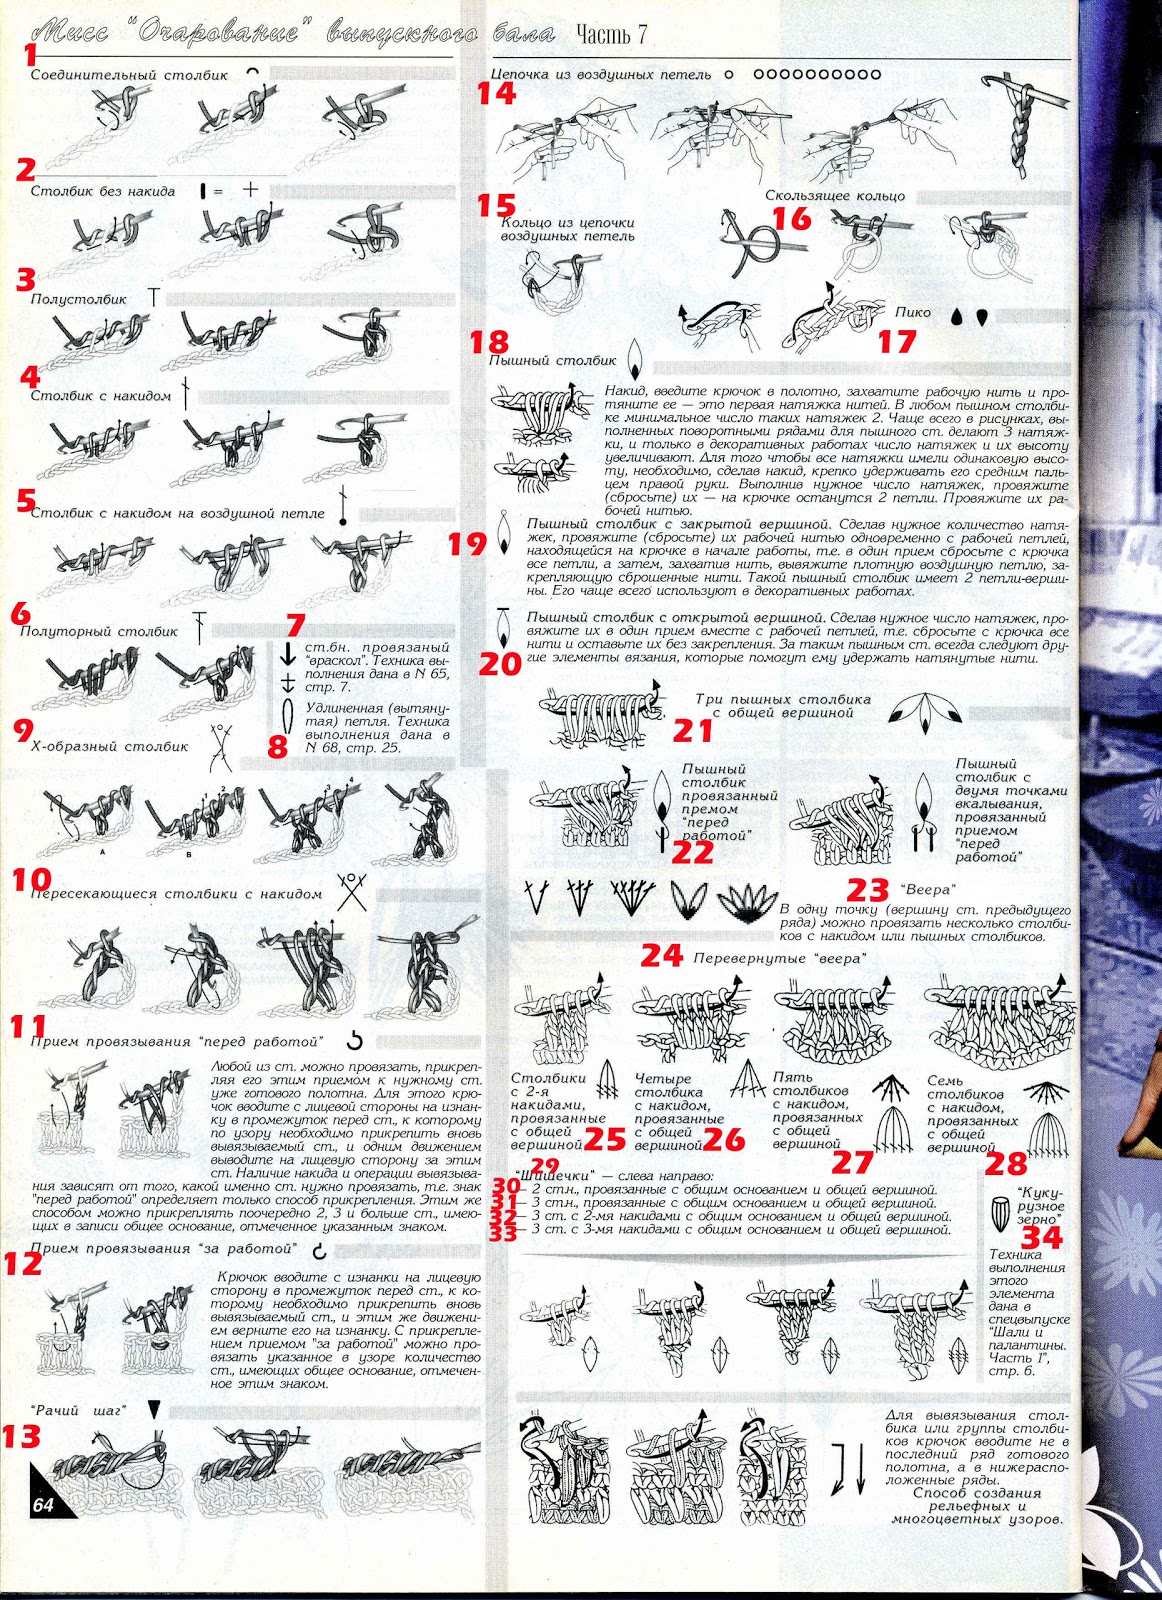
1. Соединительный столбик – joining stitch
2. Столбик без накида – single crochet
3. Полустолбик – slip stitch
4. Столбик с накидом – double crochet
5. Столбик с накидом на воздушной петле – double stitch on chain
6. Полуторный столбик – double and half stitch
7. Ст.бн. – single crochet
8. Удлиненная петля – extended loop
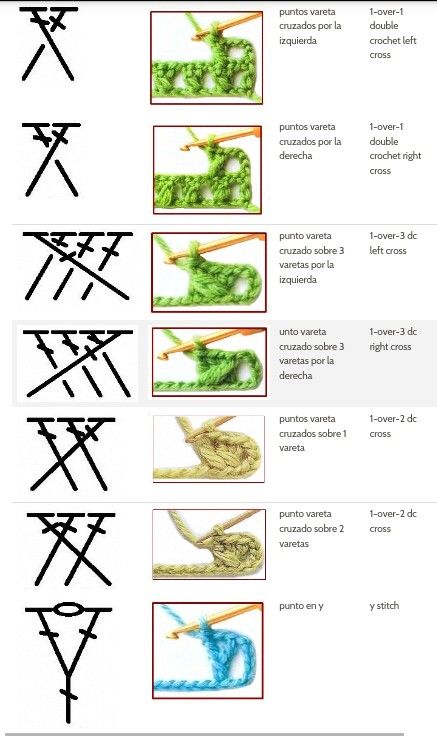
9. Х-образный столбик – x-shaped stitch
10. Пересекающиеся столбики с накидом – crossed double crochet
11. Прием провязывания «перед работой» – front post crochet
12. Прием провязывания «за работой» – back post crochet
13. Рачий шаг – reverse single crochet
14. Цепочка из воздушных петель – chain
15. Кольцо из цепочки воздушных петель – chain ring
16. Скользящее кольцо – magic ring
17. Пико – picot
18. Пышный столбик – puff stitch
19. Пышный столбик с закрытой вершиной – closed top puff stitch
20. Пышный столбик с открытой вершиной – open top puff stitch
21. Три пышных столбика с общей вершиной – three puff stitches closed together
22. Пышный столбик провязанный перед работой – puff stitch post crochet
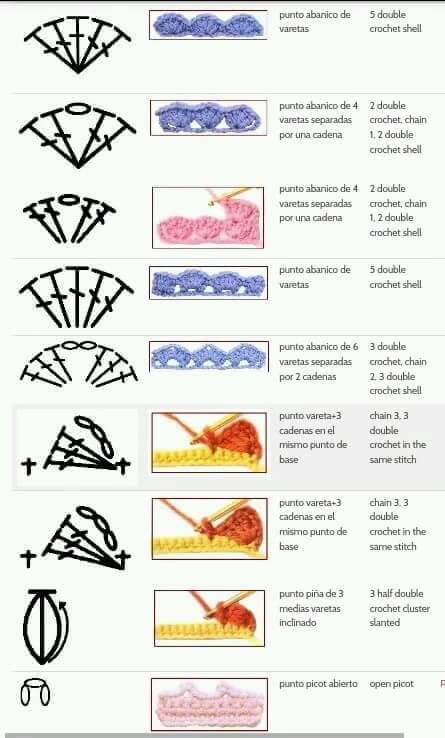
23. Веера – shells
24. Перевернутые веера – flipped shells
25. Столбики с 2-мя накидами провязанные с общей вершиной – treble stitches closed together
26. Четыре столбика с накидом провязанные с общей вершиной – four double stitches closed together
27. Пять столбиков с накидом провязанные с общей вершиной – five double stitches closed together
28. Семь столбиков с накидом провязанные с общей вершиной – seven double stitches closed together
29. Шишечки – clusters (look from the left)
30. 2 ст.н. провязанные с общим основанием и общей вершиной – two doubles with common base and top
31. 3 ст.н. провязанные с общим основанием и общей вершиной – three doubles with common base and top
32. 3 ст. с 2-мя накидами с общим основанием и общей вершиной – three trebles with common base and top
33. 3 ст. с 3-мя накидами с общим основанием и общей вершиной – three double trebles with common base and top
34. Кукурузное зерно – popcorn

FANTASTIC!!!! WELL DONE!! 10 times better than google translator could ever do