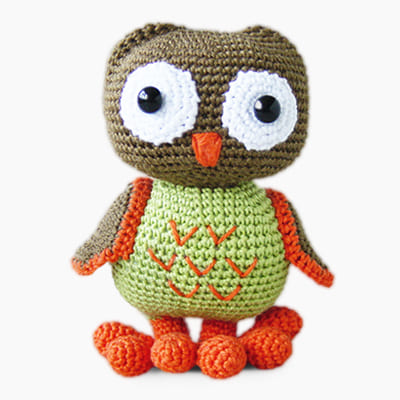
This pattern provides step-by-step instructions to create an adorable amigurumi owl. The owl is constructed primarily starting from the head and working down into the body in continuous spirals. Features like toes, feet, wings, eyes, and beak are made separately and then attached to complete the charming design. The example project uses sport-weight cotton yarn.
Skill Level: Intermediate
Sizes: One size.
Finished Measurements: Approximately 6 inches (15 cm) tall.
Note: Final size will vary depending on your chosen yarn, hook size, and individual tension.
Materials Used:
- Yarn: Sport-weight cotton yarn (e.g., Schachenmayr Catania – 100% Cotton, approx. 137 yds/50g per skein) in 4 colors:
- Brown (Head)
- Green (Body)
- Orange (Legs, Toes/Feet, Beak)
- White (Eyes)
- Crochet Hook: 2.5 mm
- Notions:
- Pair of 8 mm sew-on black eyes
- Soft stuffing (fiberfill)
- Tapestry needle (long recommended)
- Scissors
- Sewing pins
- Stitch marker
Gauge: Gauge is not explicitly stated in the pattern. However, it is recommended to work with a tight tension to create a dense fabric so the stuffing does not show through.
Stitch Guide:
- inc (Increase): Work 2 single crochet stitches in the same stitch.
- dec (Decrease): Single crochet 2 stitches together (an invisible decrease is recommended for amigurumi).
- Invisible Finish Off: A technique used to create a neat, seamless finish when fastening off pieces worked in the round (often used on the wings and eyes).
Pattern Notes:
- Pay close attention to the instructions for joining the toes and creating the leg openings.
- This pattern uses US crochet terminology.
- The main parts (head/body) are worked in continuous spirals. Do not join rounds with a slip stitch unless specifically instructed (like when creating leg openings).
- Use a stitch marker to mark the first stitch of each round and move it up as you work. This is crucial for keeping track in continuous spirals.
- Stuff the owl firmly as you go, adding more stuffing before openings are fully closed.