Heavenly Creations: Free Crochet Angel Patterns and How to Read the Charts
Christmas is that time of year again when the air is filled with a certain sparkle, and our crafting hands seem to instinctively reach for shimmering threads and delicate designs. I don’t know about you, but for me, that means one thing: free crochet angel patterns!
There’s something so special about crocheting an angel. Whether you’re making a tree topper, a guardian for your loved ones, or simply adding a touch of whimsy to your home decor, these little figures radiate peace and beauty. And the best part? There are tons of gorgeous free crochet angel patterns out there just waiting to be discovered.
Lately, I’ve been diving headfirst into the world of crochet diagrams – those visual blueprints that can sometimes seem a little intimidating at first glance. But trust me, once you understand the basics, reading a crochet diagram is like unlocking a whole new world of pattern possibilities! In this post, I’ll give you the knowledge you need to start making your own free crochet angel today.
NOTE: I have attempted to describe the diagrams to the best of my ability, mistakes can be made as I am only human, please kindly leave a message in the comments if anything is incorrect.
Angel Favor
Stitches:
- Chain (cat.)
- Slip Stitch (m. bassissima)
- Single Crochet (m. bassa)
- Double Crochet (m. alta)
- Back Loop Single Crochet (Maglia bassa in costa dietro): Insert the hook only into the back loop of the base stitch and work a single crochet normally.
- Back Loop Double Crochet (Maglia alta in costa dietro): Yarn over, insert the hook only into the back loop of the base stitch and work a double crochet normally.
Schematics:
- Schema 1: Front part of the angel
Measurements:
- 9×12 cm
Instructions:
Head, Body, and Front Dress of the Angel
The work begins from the center of the head. With the beige thread, form a magic ring.
- Round 1: 3 ch (counts as the first dc in all rounds and rows), 15 dc, close with 1 sl st in the 3rd ch of the beginning.
- Round 2: 3 ch and 1 dc in the first st, 2 dc in each st to the end of the round, close with 1 sl st in the 3rd ch of the beginning.
- Row 3: 1 ch (counts as the first sc), 1 sc in each of the next 3 sts, turn.
Continue in rows, working back and forth, following Schema 1.
At the end of row 21, cut and fasten off the thread.
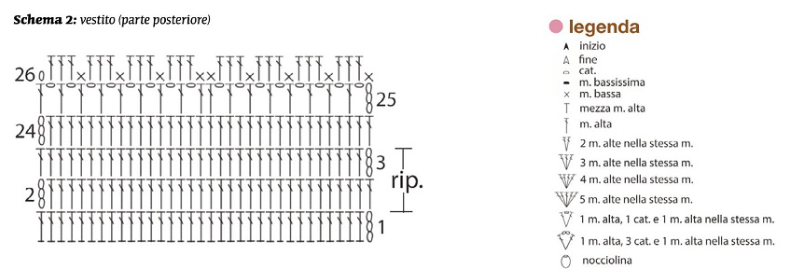
Back Dress
- Row 1: On the right side of the work (dr. del lav), join the beige thread into the 3rd ch of the beginning of the 19th row, behind the last back loop single crochet of the 20th row, then work 1 back loop double crochet in the free loop of each stitch of the 19th row (behind the back loop single crochet of the 19th row); at the end, turn.
Continue in rows, working back and forth, following Schema 2, repeating the second and third rows for another 10 times.
At the end of the 26th row, cut and fasten off the thread.
Overlap the side edges of the back and front parts of the dress, carefully matching the rows; then join the edges of each side together with a row of single crochet evenly.
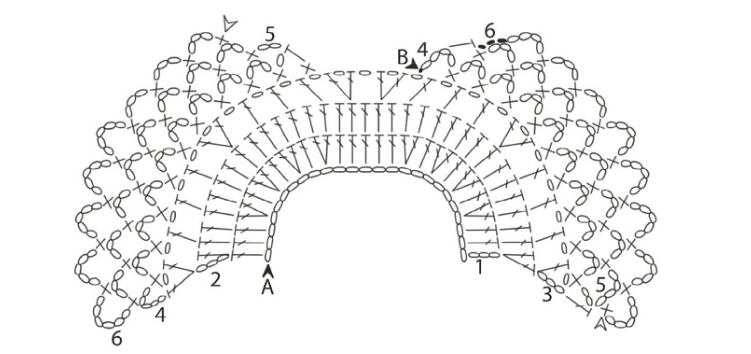
Wings
With the beige thread, chain 28 and, starting from the 5th chain from the hook, work following Schema 3. At the end of the third row, continue on the 2 sides separately. Cut and fasten off the thread.
Cord
Holding together the beige thread and the gold lurex thread, chain 50, cut and fasten off the thread.
Finishing
Cut and hide all loose ends between the stitches. Sew the wings to the back of the angel with small invisible stitches. With two strands of gold lurex thread, embroider the crown with back stitch on the head of the angel (see photo). Pass the cord through the stitches of the 25th row of the back dress, insert confetti (dragees/sugar almonds if you want it to be a favor) and tighten at the waist, pulling the ends of the cord and tying in a small bow. If desired, starch the upper part of the angel and the wings to stiffen them slightly.
Gold Trim Angel
A classic crochet angel pattern, designed to be made in the round from the top down. The body is primarily made with what appears to be double crochet stitches and chain spaces to create a delicate, lacy effect. The wings are separate and seem to be attached later. A metallic thread outlines the angel, giving it a polished finished look.

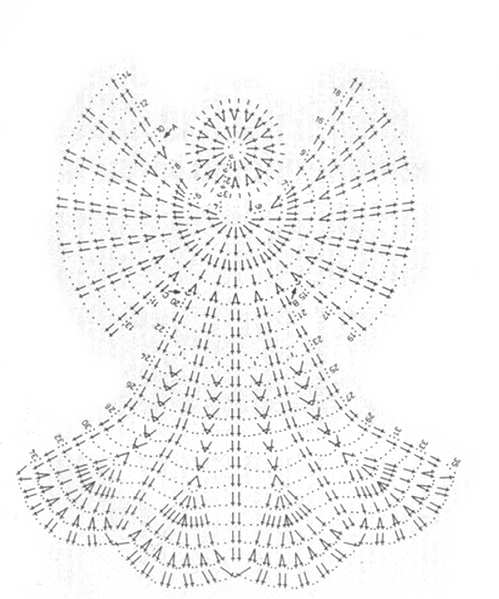
Decoding the Symbols (from what I can see in the image):
- Circle/Oval (starting at the top center): This is definitely the starting point, and I’d bet money it represents a chain stitch. The first few rounds seem to be working chains in a ring, followed by a series of increases to form the head.
- “T” shape (predominant symbol): This represents a double crochet (dc). Most of the angel’s body is formed using this stitch. The pattern probably calls for dc and chain-space combinations.
- Dot/Small Circle: This represents a slip stitch.
- Arrow (pointed down): This symbol represents a chain space.
Describing the Pattern Flow:
- Head: It begins with a ring of chain stitches (the circle). It looks like you will then increase with double crochet stitches and chains in each round, which will eventually form the head of the angel.
- Body: After that, the pattern transitions to the body, working down in rounds. The alternating pattern of double crochets and chains creates the open, lacy texture. As you go down, you’ll start seeing the rounds become larger and begin to flair to make the body. You will continue doing dc with chains.
- Skirt Edging: Notice how the bottom of the skirt changes as you get to rows 35/36. You are decreasing in these rows by not doing a chain and doing dc in consecutive stitches.
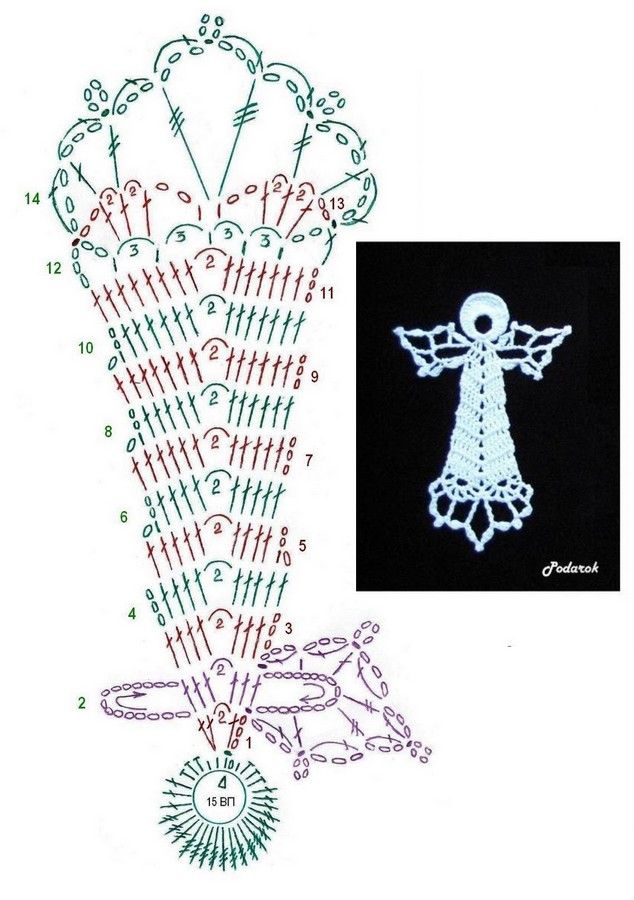
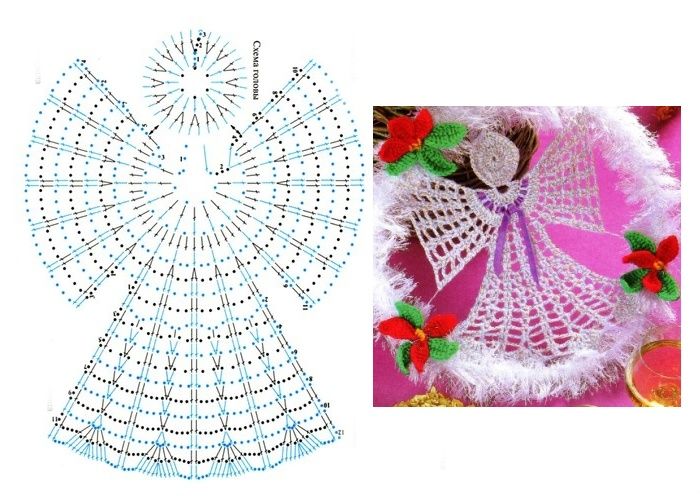
3D Angel
This pattern is designed to create a 3D standing angel. The skirt is conical and flared. The head and neck are solid, probably made with single crochet. The wings are separate and attached. What’s interesting is the use of beads (koralik) to embellish the wings and hem.
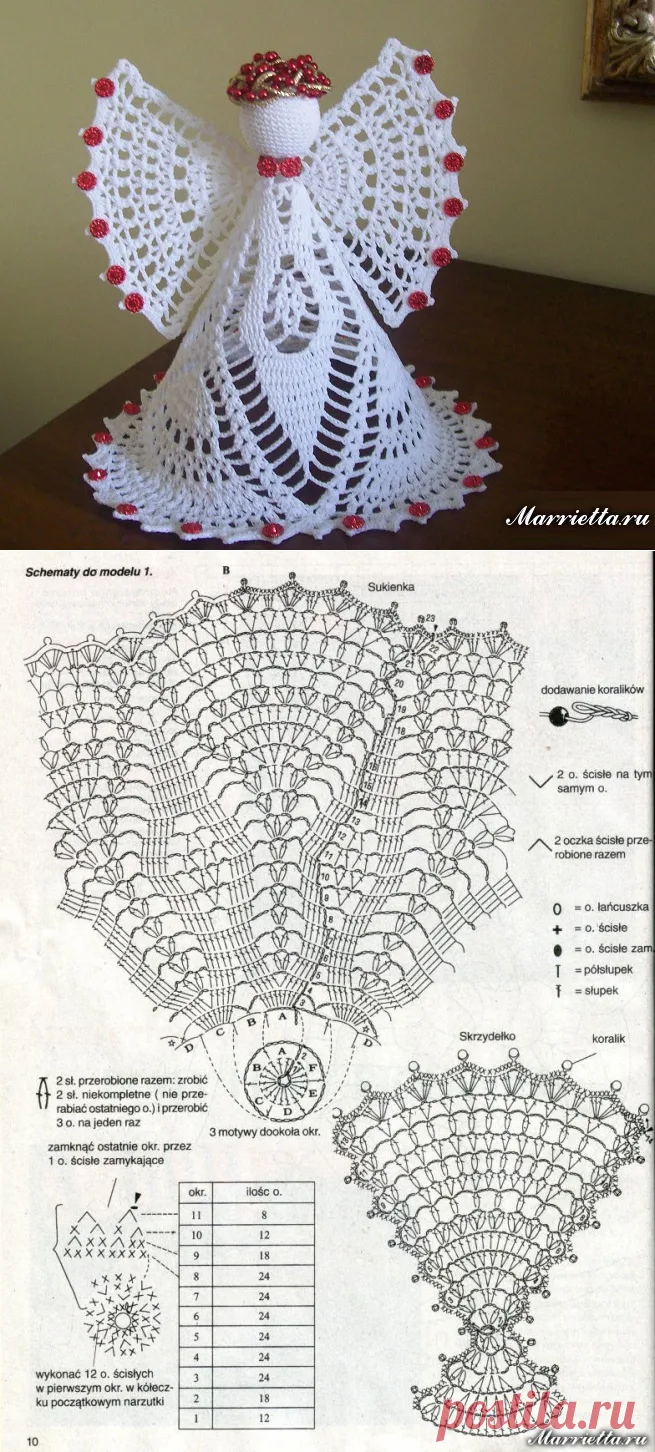
Symbol Interpretation (Revised):
Okay, the key is essential! Here’s a full translation:
- 0 = o. łańcuszka = Chain (ch)
- + = o. ścisłe = Single Crochet (sc)
- . = o. ścisłe zam. = Slip Stitch (sl st)
- T = półłupek = Half Double Crochet (hdc)
- F = słupek = Double Crochet (dc)
- Circle with a “koralik” Label: Bead
Other Notations:
- “2 sl. przerobione razem: zrobić 2 sl. niekompletne (nie przerabiać ostatniego o.) i przerobić 3 o. na jeden raz”: This is a polish description but it’s essentially telling you to do a decrease over 2 stitches, meaning work 2 incomplete stitches together into one.
- “Dodawanie koralików” Adding beads. The way it is being added is showing a slip stitch to attache it.
Pattern Flow (Detailed):
- Head (based on picture and diagram): The pattern starts with a small center and continues in rounds until large enough to create the head, and likely uses single crochet to get that solid, dense fabric. The head and neck transition smoothly into the main body.
- Neck: The transition to the “dress” is interesting, there is one row with some double crochet to then start the dress
- Body/Skirt: The dress part is done with a repeating pattern of double crochet stitches, half double crochet and chain spaces. The rounds are starting to add more and more half double crochet. The amount of spacing between each one is creating that cone shaped skirt. The number of “open” stitches can be seen in row 7 to 12.
- Skirt Edging: You can see at the end of the skirt rows 21 through 23 doing the same thing as described earlier but now adding a bead to it.
- Wings: The wings start in the center with multiple stitches done. After this you can see that you will chain 6. You can see that the diagram contains a repeating element, so it can be repeated, meaning it contains a motif. To finish it up like the skirt add a bead to the edge.
Detailed Stitch Work and Techniques:
- Increases: You’ll see multiple stitches emerging from the same stitch below, indicating an increase. In some areas this helps with adding the beads.
- Decreases: You’ll encounter areas where several stitches converge into one, creating a decrease. This helps shape the skirt.
Key Considerations:
- Tension: Maintaining consistent tension is important to ensure the angel keeps its shape and that the lace pattern looks even.
- Blocking: After completing the project, blocking is crucial. Use pins to stretch and shape the skirt.
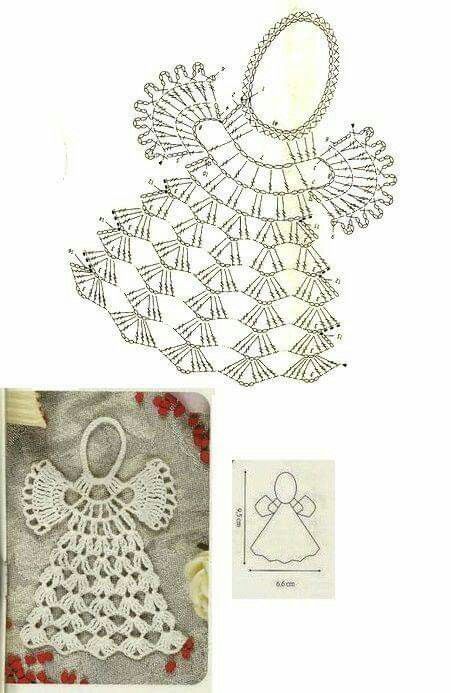
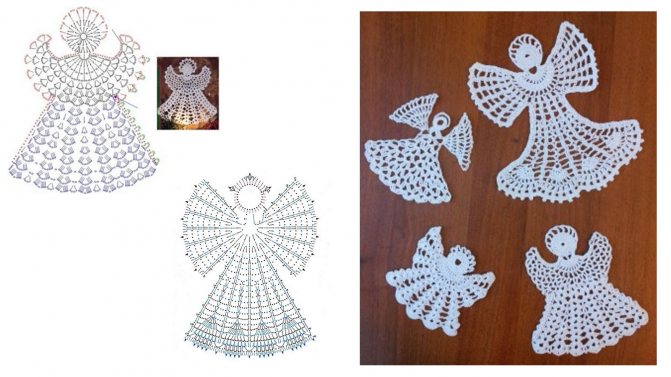
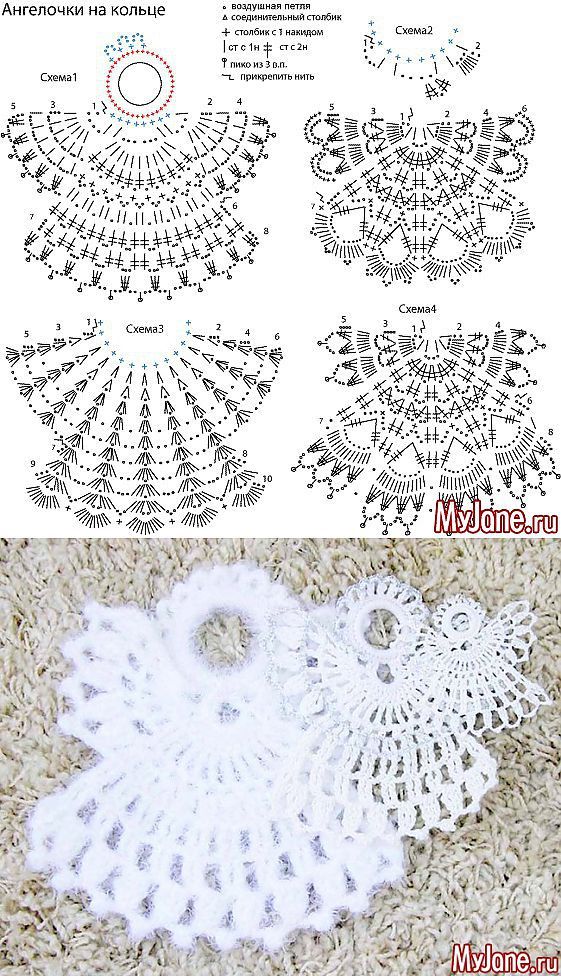
Four Angels to Crochet
This angel consists of four different crochet circle patterns: one large circle for the body, two smaller circles for the wings, and a very small circle for the head (connected to a ring). These are then joined to create an angel shape.
Symbol Interpretation (using the key):
- Open Circle: Air Loop (Chain Stitch – ch)
- Plus Sign (+): Connecting Post (Slip Stitch – sl st)
- ‘T’ with one line: Pole with 1 Cap (Double Crochet – dc)
- ‘T’ with two lines: Pole with 2 Caps (Treble Crochet – tr)
- Checkmark: Pico of 3 air loops (picot of 3 ch)
- curved line Fasten thread
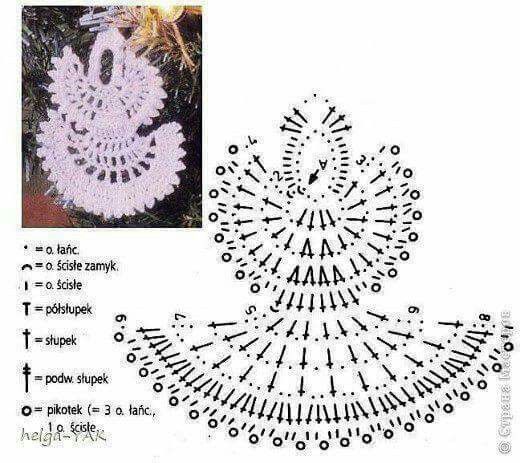
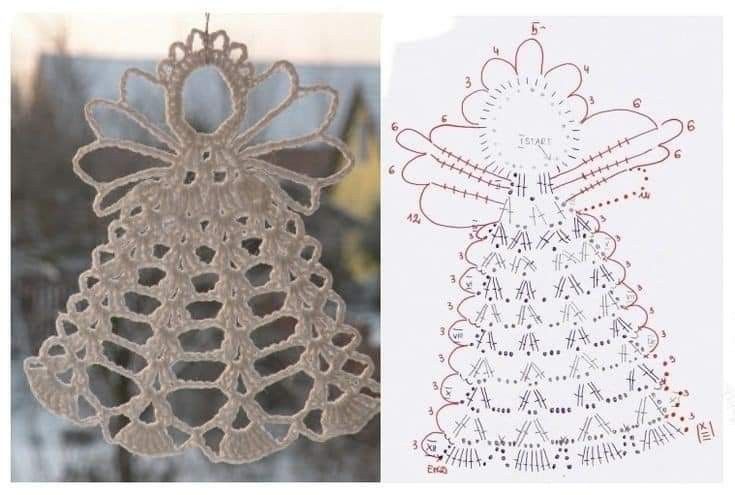
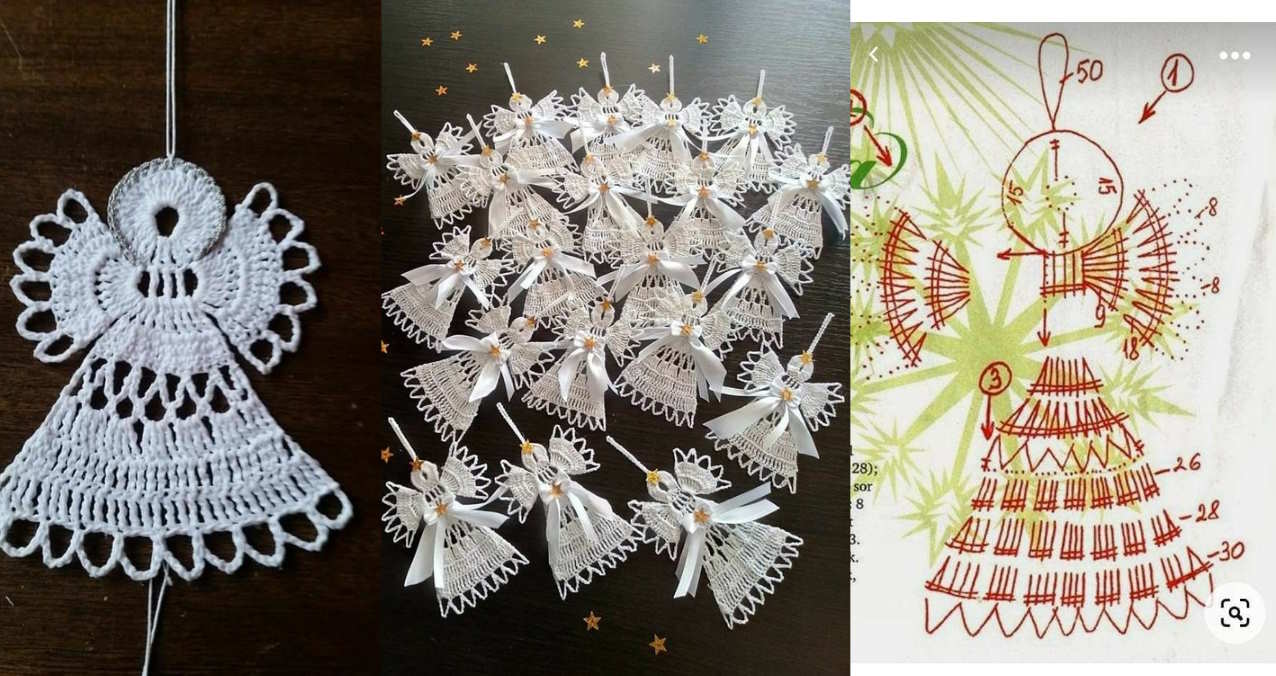
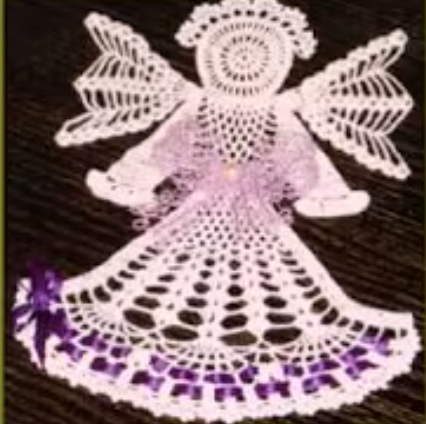
Free Crochet Angel Hanging Tree Ornament Pattern
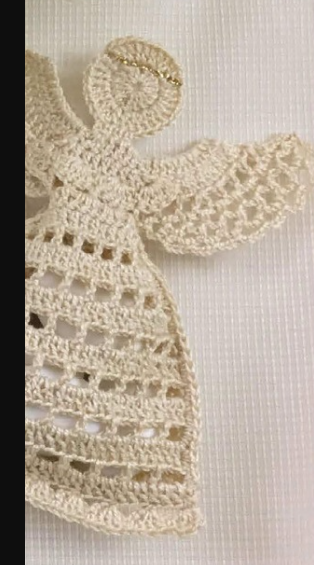
This free crochet angel ornament pattern offers a vintage-inspired design, perfect for adding a nostalgic touch to your holiday tree. The pattern starts at the top with a circular head, then creates the wings with a series of shells, double crochet and chain stitches, and finishes with a triangular body made with rows of double crochet and picot edging. The simple construction makes it a great project for beginner to intermediate crocheters. You’ll be able to whip up a whole host of angels in no time! In the end, you can personalize the ornament with ribbons and decorative beads.
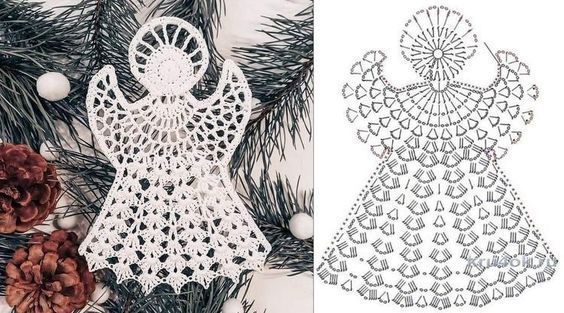
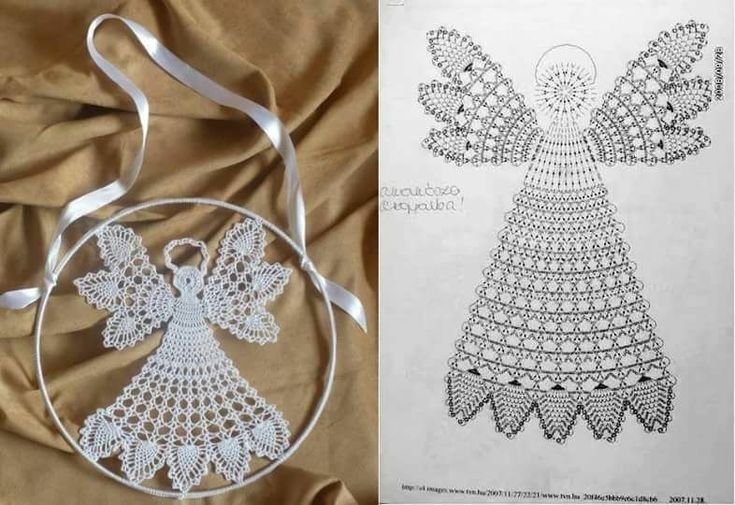
Pretty Crochet Angel
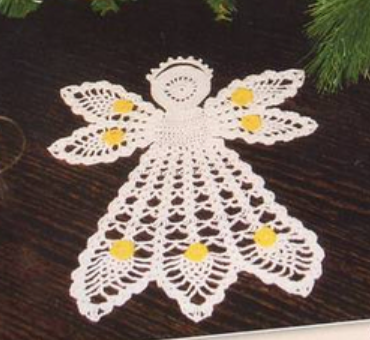
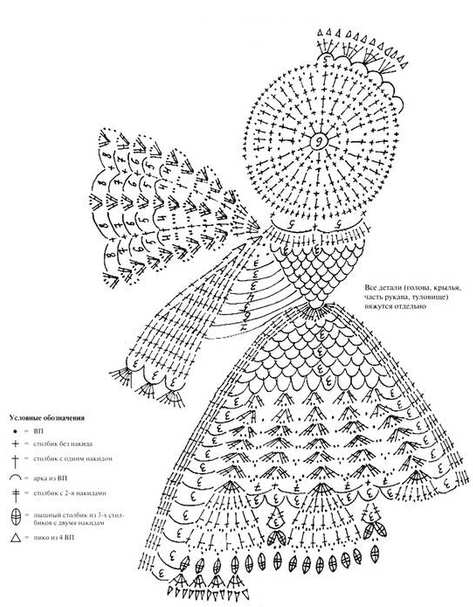
This crochet angel pattern combines solid and lacy textures to create a delicate and ethereal design. The angel is crocheted in separate parts (head and wings), which are then attached to the main body/dress. The main body features a fan-like shape that transitions into a beautifully detailed skirt with pineapple accents along the bottom.
Decoding the Symbols:
Based on the symbol key, here’s a breakdown:
- Open Circle: Chain stitch (ch)
- + with line: single crochet (sc)
- T with line: double crochet (dc)
- Curved Line: chain space
- Upside down Triangle with 4 sticks attached: 4 double crochets closed together
Pattern Flow and Construction:
- Head ( separate): It looks like it is started with a circle and increase until you like how big it is.
- Wings (Separate): Each wing is made of what appears to be multiple double crochets together. Then along the edge are the double crochet stitches with 2 yarn over.
- Main Body/Dress: The main part is crocheted in row. First, you make the part under the neck using multiple double crochet stitches in each line. After that from line 11 to 24 you continue with different combination of double crochet and chain stitches. After it, you start decrease to create pineapple like ending, after doing 3 sets of decreasing, it can be finished.
- Stiffening: A final note I would like to add is that after finishing the angel, it is probably needed to stiff it, if you want it to be able to stand.
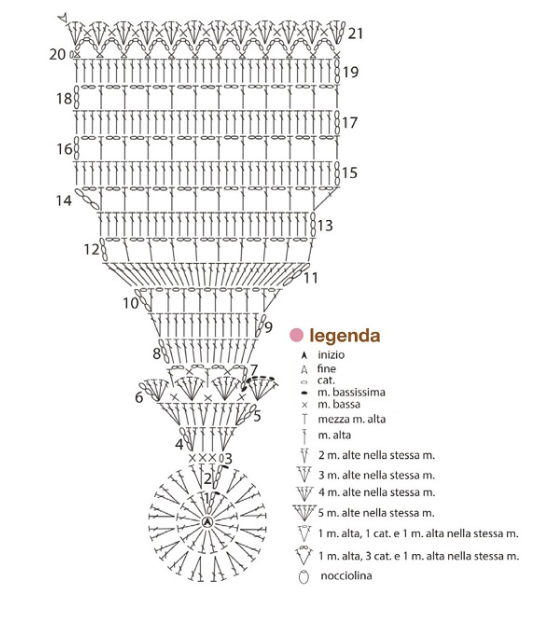
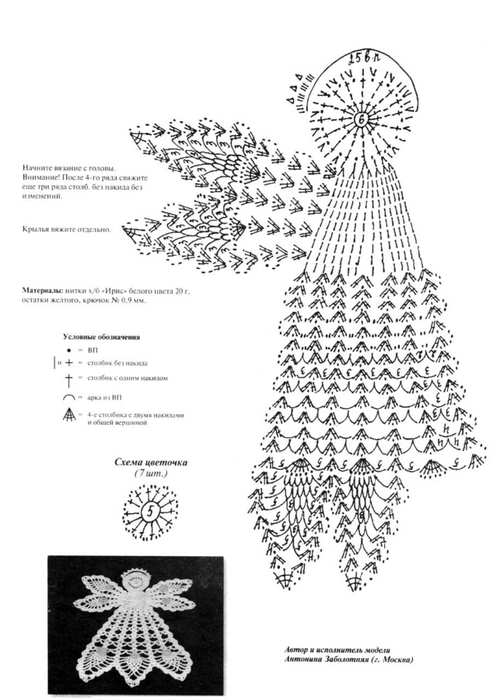
Pineapple Crochet Angel
The angel is crocheted in one piece, starting with the head and working down to the skirt/dress. The head and top portion of the wings are separate and attached later. The skirt is a stylized pineapple shape, achieved through increasing and decreasing stitches to create the characteristic pointed and rounded design elements. Picots accent the bottom of the skirt.

Reading the Diagram (limited by resolution, but here’s what I can decipher):
Key to Symbols (from the diagram):
- dot: chain (ch)
- +: single crochet (sc)
- T: double crochet (dc)
- Curved line: chain space, likely consisting of multiple chains (ch)
- Triangle: picot of 4 chains
Pattern Breakdown:
- Head (separate): Is made from double crochet.
- Wings (separate) The wings consist of chains and double crochet.
- Body:
- Begins with a series of chains and slip stitches to form a ring, then rounds of double crochet and chains for the yoke.
- Then it changes with increasing each line from a combination of chain and double crochet stitches. You can see from the 11 row you are doing more stitches to get that wide pineapple skirt. The edge of the dress consists of single crochet, picots, and chains that creates the final edge.
General Tips:
- Tension: Consistent tension is key to creating a balanced and well-defined pineapple pattern.
- Blocking: Blocking is essential to open up the lace and define the points of the pineapple. Starch is also helpful.
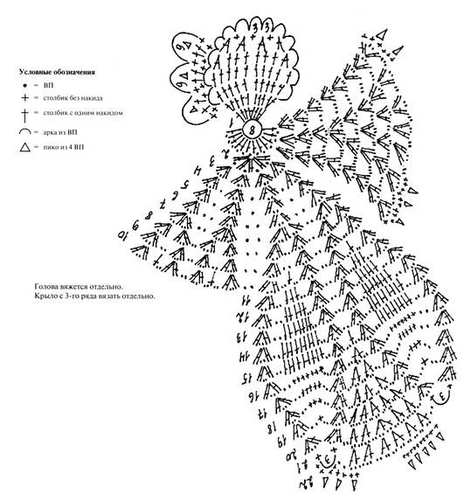
Sweet Crochet Angel Pattern
This crochet angel pattern presents a unique combination of solid and scale/shell textures, creating a visually interesting and elegant design. The angel has multiple parts: the head, the body, and the wings.
Decoding the Symbols:
- Open Circle: chain stitch (ch)
- +: single crochet (sc)
- T: double crochet (dc)
- T with one more line on top: Triple crochet (tr)
- Curved line: chain space
- Oval with 3 vertical lines: puff stitch from 3 triple crochet stitches
- Upside down Triangle : picot
Why I Love Using Crochet Diagrams for Free Crochet Angel Patterns
While written patterns are fantastic, I find diagrams particularly helpful when working on intricate designs like many free crochet angel patterns. Here’s why:
- Visual Representation: Diagrams provide a clear visual map of the entire project. You can see the overall shape, the stitch placement, and how the different sections connect. This is especially helpful for complex motifs or lace patterns.
- Reduced Ambiguity: Sometimes, written instructions can be a bit vague or open to interpretation. Diagrams leave less room for error because you can see exactly what the designer intended.
- Language Independent: Diagrams are universally understood! Even if a pattern is written in a language you don’t speak, you can still follow the diagram.
Decoding the Symbols: A Beginner’s Guide to Crochet Diagrams
Okay, let’s demystify those symbols! Don’t worry, you don’t need to memorize everything at once. Start with the basics, and you’ll pick it up quickly.
- Chain Stitch (ch): Usually represented by an oval (O) or a dot (.). A row of them will look like a little chain!
- Single Crochet (sc): Looks like a ” + ” or an “X”.
- Double Crochet (dc): Represented by a “T” shape. Sometimes the “T” will have one slash through it.
- Treble (Triple) Crochet (tr): Similar to a double crochet, but it has two slashes through the “T.”
- Slip Stitch (sl st): Often shown as a solid dot or a small circle.
- Increases: You’ll often see multiple stitches represented as coming out of a single stitch in the row below. This indicates an increase. For example, to sc increase (sc inc) you will see two X’s coming out of the same stitch.
- Decreases: A decrease might be represented as several stitches being joined together at the top. You may see a series of sc (x’s) being joined at the top to decrease (sc dec)
How to Read a Crochet Diagram for Your Free Crochet Angel
Here’s a general step-by-step guide:
- Find the Starting Point: Most diagrams are read from the center outwards or from the bottom upwards. Look for a clear indication of the starting point, which is often a chain or a circle.
- Follow the Rows/Rounds: Diagrams are usually laid out in rows or rounds, just like written patterns. Follow the symbols sequentially, row by row or round by round. They will usually have the number written on the side to help you keep track.
- Pay Attention to Stitch Placement: The placement of the symbols in relation to the previous row or round is crucial. The symbol will sit directly above the stitch in the previous round that you are working on. Is the double crochet symbol sitting right above a single crochet in the row below? That means you need to work a double crochet into that single crochet!
- Understand Repeats: Diagrams often use brackets or asterisks (*) to indicate sections that need to be repeated. Pay close attention to these markers and the instructions accompanying them.
- Don’t Be Afraid to Zoom In: If a section of the diagram is particularly intricate, zoom in to get a better view of the symbols and their placement. If it is a printed pattern use a magnifying glass.
- Practice Makes Perfect! The best way to learn to read diagrams is to practice. Start with a simple free crochet angel pattern with a straightforward diagram, and gradually work your way up to more complex designs.
More Crochet Angel Diagrams: