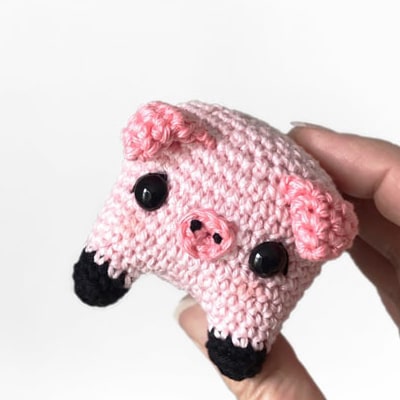
Little Amigurumi Pig Free Crochet Pattern. This pattern provides instructions for crocheting a small amigurumi pig. The pig is constructed starting with the four legs, which are then joined to form the bottom part of the body. A separate section forms the upper body and head. Features like the snout, ears, and tail are made separately and attached. The example uses sport-weight cotton yarn and results in a pig approximately 2.5 inches tall, suitable as a keychain, bag charm, or small toy.
Skill Level: Intermediate
Sizes: One size.
Finished Measurements: Approximately 2.5 inches / 6 cm tall (using sport-weight yarn and 2.5mm hook).
Materials Used:
- Yarn: Sport-weight cotton yarn (e.g., 100g/250m/273yd per skein) in 4 colors:
- Baby Pink (Main body): 11g / 27.5m / 30yd
- Pink (Snout, Ears, Tail): 6g / 15m / 16yd
- Black (Feet bottoms, Nostrils, Eye details): 3g / 7.5m / 8yd
- Gray (Mentioned in list, but usage not specified in provided text – potentially for optional shorts not detailed here)
- Crochet Hook: 2.5 mm
- Notions:
- Pair of 8 mm black eyes (Safety eyes recommended, see Pattern Notes)
- Soft stuffing (fiberfill)
- Long tapestry needle
- Scissors
- Sewing pins
- Optional: Blush for cheeks, thin black yarn/thread for nostrils/eye details.
Gauge: Gauge is not explicitly stated. Using the recommended yarn and hook size yields a pig approx. 2.5 inches tall. Aim for tight stitches so stuffing does not show.
Stitch Guide:
- French Knot: An embroidery stitch used for the nostrils (optional, straight stitches can be substituted).
- inc (Increase): Work 2 single crochet stitches in the same stitch.
- dec (Decrease): Single crochet 2 stitches together (invisible decrease recommended).
- Working in Back Loops: Insert hook only into the back loop of the stitch.
- Working in Front Loops: Insert hook only into the front loop of the stitch.
- Invisible Join: A method for fastening off rounds seamlessly.
Pattern Notes:
- This pattern uses US crochet terminology.
- The pig is constructed primarily in continuous spirals. Do not join rounds unless specified.
- Use a stitch marker to mark the beginning of rounds.
- The body is worked bottom-up, starting with the legs. Pay close attention to the instructions for joining the legs and working into chains/unworked stitches.
- Stuff legs and body firmly as you go.
- If using safety eyes, insert them between rounds 10 and 11 of the upper body section before the opening becomes too small.
- The pattern mentions making shorts but does not provide instructions for them in the text supplied.
- The snout is attached by weaving under the vertical bars of its last round stitches.
- The ears are flattened before sewing.