Pineapple Crochet Diagrams for Tops.
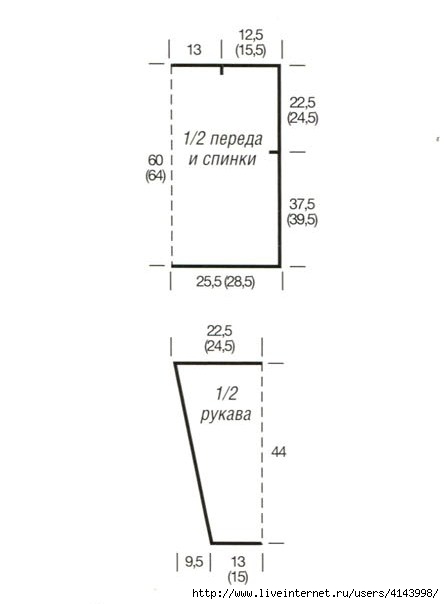
All Over Crochet Pineapple with Long Sleeves
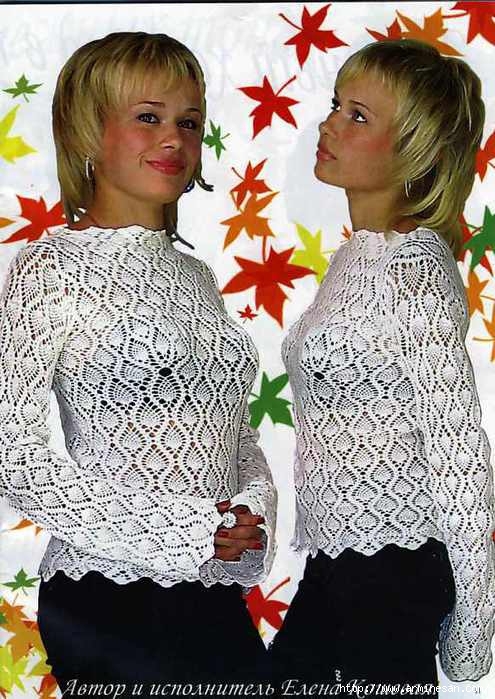
Translation of the Russian Text Above
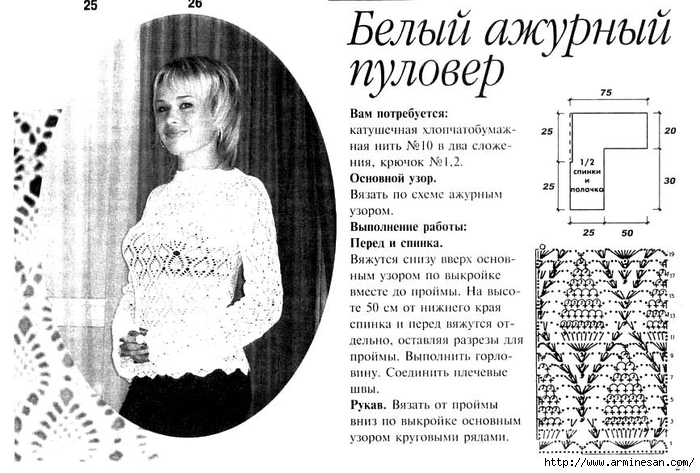
Pullover
You will need:
- Spool cotton thread No. 10, doubled (two strands held together), crochet hook No. 1.2 [Note: likely a typo, the image is of a number 2, so the hook size could be 1.5-2mm].
- The thread is No. 10 cotton.
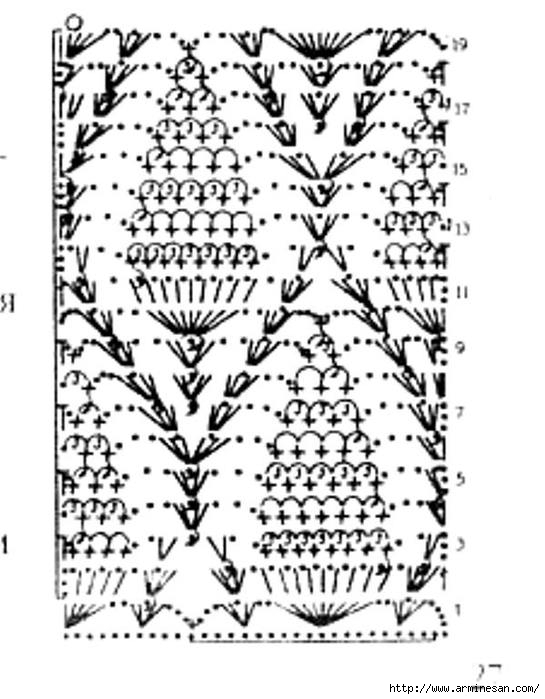
Main Pattern:
- Work in an openwork (lace) pattern according to the chart.
Instructions:
Front and Back:
- Work from the bottom up in the main pattern, following the pattern diagram, working both pieces together up to the armholes.
- At a height of 50 cm from the bottom edge, work the back and front separately, leaving openings for the armholes.
- Shape the neckline.
- Join the shoulder seams.
Sleeve:
- Work from the armhole down, following the pattern diagram, in the main pattern, working in the round (circular rows).
Key Context and Explanations for Crocheters:
- Pullover: This is a general term for a knitted or crocheted sweater that is pulled over the head.
- Spool cotton thread No. 10: This refers to the weight and type of yarn. “No. 10” is a size 10 crochet thread, which is quite fine. Using it “doubled” means you hold two strands together as you crochet, effectively making it a thicker yarn.
- Crochet hook No. 1.2 (likely a typo: 1.5-2): This specifies the hook size. 1.2 mm, 1.5mm, or 2mm are very small hooks, appropriate for working with fine thread. Crucially, check your gauge! The pattern doesn’t explicitly state a gauge, but achieving the correct gauge is essential for the garment to fit as intended. Start with hook number 2, and make adjustment as needed.
- Openwork (lace) pattern: This indicates that the stitch pattern will have holes and a delicate appearance. You’ll need to refer to the “chart” (схеме) mentioned, which would be a visual diagram of the stitch pattern.
- Bottom-up: This means you start crocheting at the bottom hem of the sweater and work your way up to the shoulders.
- Working together up to the armholes: The front and back panels are crocheted as one piece until you reach the point where the armholes begin.
- Working separately: After reaching the armhole height, you’ll stop joining the front and back and work each panel individually.
- Leaving openings for the armholes: This creates the spaces for the sleeves.
- Shape the neckline: This involves decreasing stitches to create the curve of the neckline. The specific decreases would be detailed in the chart or additional written instructions (which are missing here).
- Join the shoulder seams: Once the front and back panels are complete, you’ll sew or crochet the shoulder seams together.
- Sleeve: Work from the armhole down: The sleeves are started at the armhole opening and worked downwards towards the cuff.
- In the round (circular rows): This means you’ll be joining each row to form a continuous tube, rather than turning your work at the end of each row.
- Pattern Diagram: The provided numbers are likely measurements in centimeters, this diagram gives a general shape of the garment pieces.
- 1/2 It probably means that the drawn part is only half of the piece, the full pattern should be symmetrical.
Pineapple Crochet Pullover
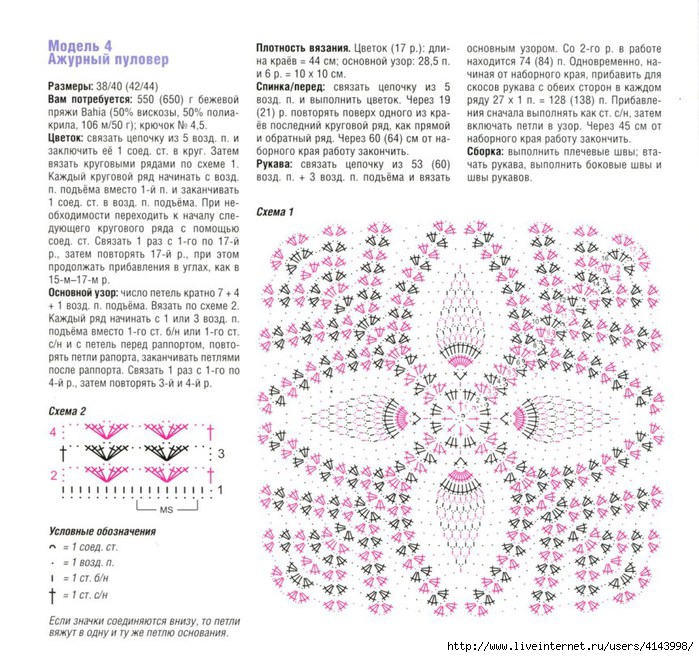
Translation of the Russian Text Above
Sizes: 38/40 (42/44) [These are European sizes. Roughly equivalent to US sizes 8/10 (12/14) or UK sizes 10/12 (14/16). Always check gauge!]
You will need:
- 550 (650) g of beige Bahia yarn (50% viscose, 50% polyacrylic, 106 m/50 g)
- Crochet hook size 4.5 mm
Flower:
- Chain 5 and join with a slip stitch to form a ring.
- Then, work in the round according to Chart 1.
- Begin each round with the number of chain stitches indicated for the turning chain (instead of the first stitch) and end with 1 slip stitch in the turning chain.
- If necessary, move to the beginning of the next round using slip stitches.
- Work rounds 1 through 17 once, then repeat round 17, continuing the increases at the corners as in rounds 15-17.
Main Pattern:
- Number of stitches is a multiple of 7 + 4 + 1 turning chain.
- Work according to Chart 2.
- Each row begins with 1 or 3 chain stitches for the turning chain (instead of the first sc or dc) and with the stitches before the repeat, repeat the stitches of the repeat, and end with the stitches after the repeat.
- Work rows 1 through 4 once, then repeat rows 3 and 4.
Chart 2: (The image you provided shows “3 MS” – this is a placeholder, the actual chart would be needed).
Gauge:
- Flower (17 rounds): edge length 44 cm
- Main pattern: 28.5 stitches and 6 rows = 10 x 10 cm
Back/Front:
- Chain 5 and work the flower.
- After 19 (21) rounds, repeat the last round over one of the edges, working back and forth in rows (instead of rounds).
- After 60 (64) cm from the starting edge, finish off.
Sleeves:
- Chain 53 (60) + 3 turning chains and work in the main pattern.
- From the 2nd row, there are 74 (84) stitches.
- Simultaneously, starting from the cast-on edge, increase for the sleeve shaping on both sides in each row 27 x 1 stitch = 128 (138) stitches.
- The increases are initially worked as double crochets (dc), then the stitches are incorporated into the pattern.
- After 45 cm from the starting edge, finish off.
Assembly:
- Sew the shoulder seams.
- Sew in the sleeves.
- Sew the side seams and sleeve seams.
Stitch Key (Legend):
- – = 1 slip stitch (sl st)
- o = 1 chain stitch (ch)
- I = 1 single crochet (sc) [Note: In US terms. In UK terms, this would be a double crochet (dc).]
- † = 1 double crochet (dc) [Note: In US terms. In UK terms, this would be a treble crochet (tr).]
- If the symbols are joined at the bottom, the stitches are worked into the same base stitch.
Explanations and Clarifications:
- Yarn: Bahia is a specific yarn brand and type. The fiber content (viscose and polyacrylic) and the meterage (106m per 50g) are important for achieving the correct gauge. If you can’t find Bahia, look for a yarn with a similar fiber content and weight (likely a DK or light worsted weight).
- Hook Size: 4.5 mm is a relatively large hook for this yarn weight, which contributes to the lacy effect.
- Flower Motif: This pattern starts with a large flower motif that forms the center of the front and back panels.
- Working Back and Forth: After completing the flower motif to a certain size, you’ll switch from working in the round to working in rows, essentially extending one side of the flower to create the body of the sweater.
- Main Pattern: This is the stitch pattern used for the body and sleeves, after the initial flower motif. You’ll need Chart 2 to work this pattern.
- Gauge (VERY IMPORTANT!): The gauge is given for both the flower motif and the main pattern. Making a gauge swatch is essential to ensure your finished sweater will be the correct size. Adjust your hook size if necessary to match the gauge.
- Sleeve Increases: The pattern calls for increasing 1 stitch on each side, every row, for 27 rows. This creates a fairly rapidly increasing sleeve.
- US vs. UK Terminology: The stitch abbreviations are given in Russian terms, which are closer to UK terms. I’ve provided both US and UK equivalents in the translation above. Be sure you’re using the correct terminology for your region.
- “3 MS”: This is likely an abbreviation on chart 2 that means “3 stitches”. It’s a part of the drawing of the chart 2.
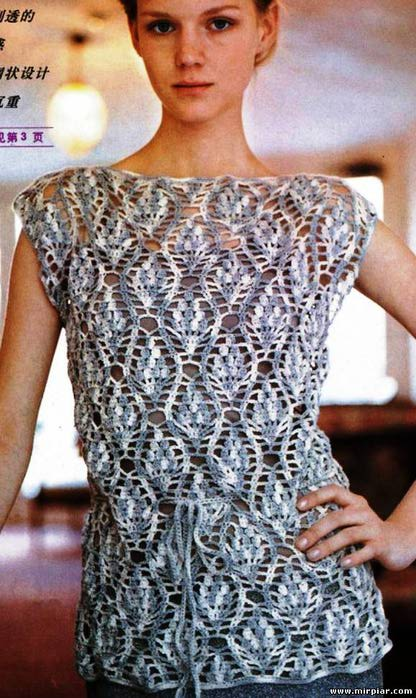
Pineapple Lace Crochet Tank Top

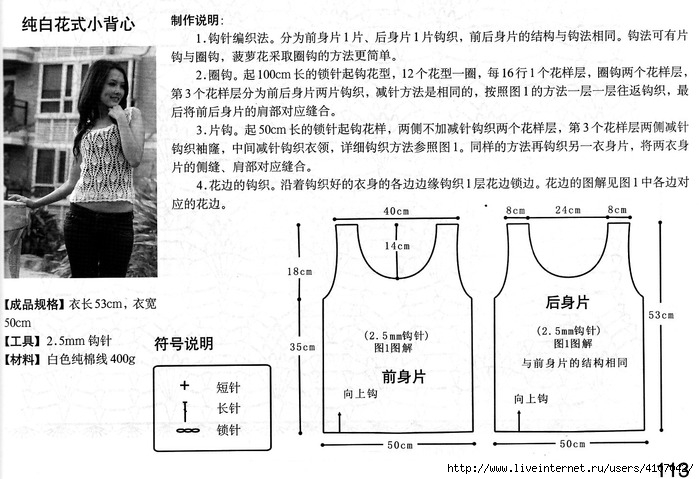
Translation of Pineapple Crochet Tank Top Pattern Above:
Instructions:
[Finished Garment Measurements]:
- Garment Length: 53 cm
- Garment Width: 50 cm
[Tools]:
- 2.5 mm crochet hook
[Materials]:
- White pure cotton yarn, 400g
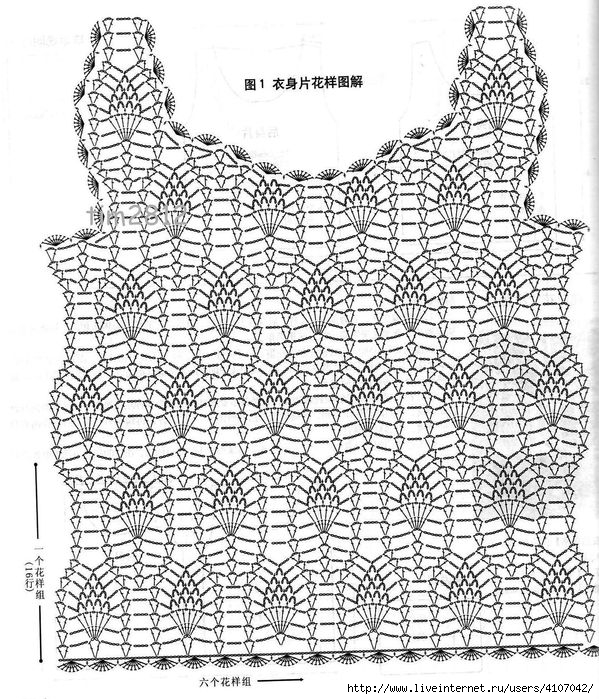
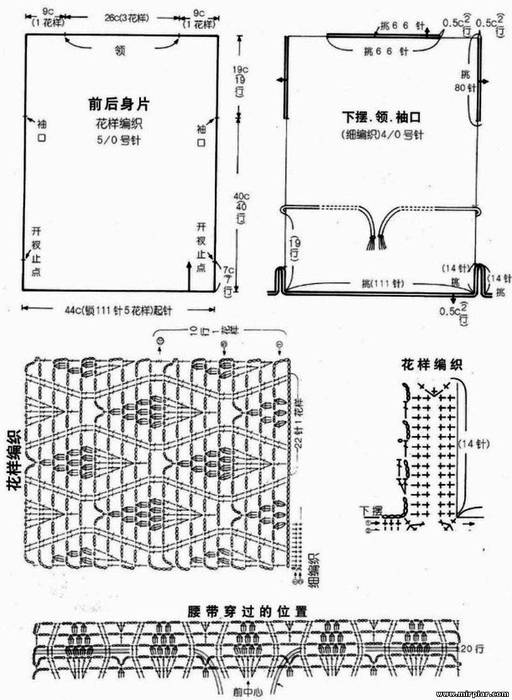
- Crochet Method: The garment is divided into 1 front piece and 1 back piece, which are crocheted separately. The structure and crochet method for the front and back pieces are the same. You can choose between “piece crochet” (flat) and “circular crochet” (in the round). For the pineapple stitch pattern, circular crochet is simpler.
- Circular Crochet (In the Round):
- Start with a chain 100 cm long for the foundation of the pattern.
- This forms 12 repeats of the pattern in a round.
- Each pattern repeat (“flower pattern layer”) is 16 rows high.
- Work 2 pattern repeats in the round.
- For the 3rd pattern repeat, divide the work into two separate pieces (front and back) and crochet them separately. The decreasing method is the same for both. Follow the method shown in Figure 1, working back and forth in rows.
- Finally, sew the corresponding shoulder seams of the front and back pieces together.
- Piece Crochet (Flat):
- Start with a chain 50 cm long for the foundation of the pattern.
- Work two pattern repeats without increasing or decreasing on the sides.
- For the 3rd pattern repeat, decrease on both sides to shape the armholes, and decrease in the center to shape the neckline. Refer to Figure 1 for detailed instructions.
- Crochet the other body piece (front or back) using the same method.
- Sew the side seams and shoulder seams of the two body pieces together.
- Edging:
- Along all the edges of the crocheted garment pieces, work 1 row of edging to finish the edges.
- The chart for the edging is shown in Figure 1, corresponding to each edge.
Crochet pineapple sleeveless top pattern
Pineapple Lace Crochet Top
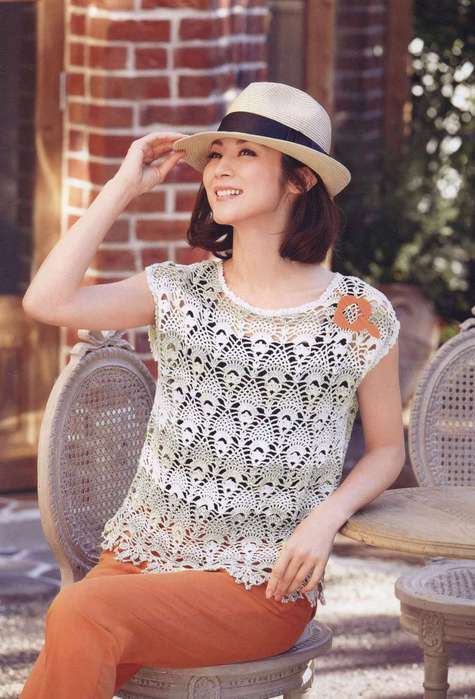

Cute Crochet Long Sleeve Top
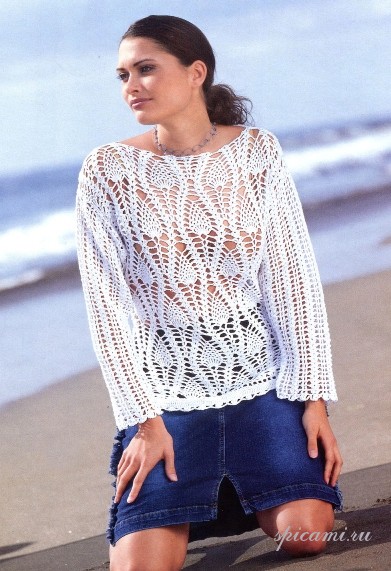
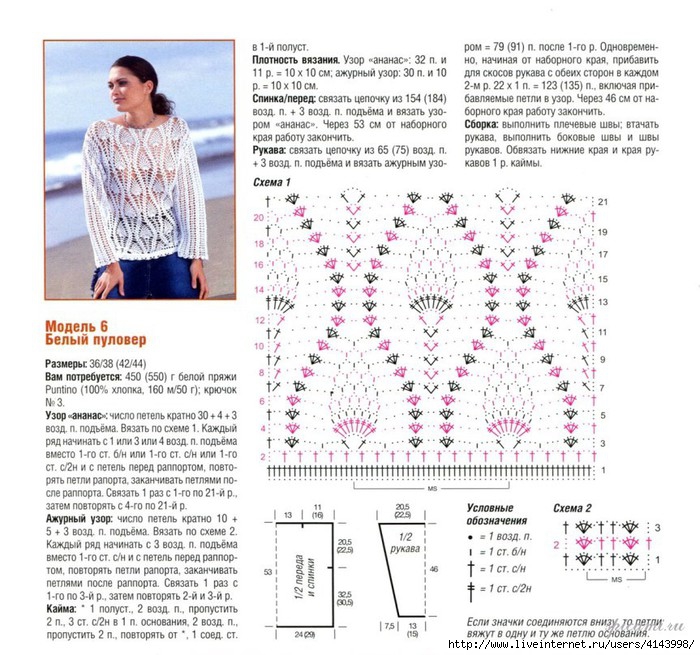
Translation of Pineapple Crochet Top Pattern Above:
Model 6 White Pullover
Size: 36/38 (42/44) [European sizes, roughly US 6/8 (12/14) or UK 8/10 (14/16)]
You will need:
- 450 (550) g of white Puntino yarn (100% cotton, 160 m/50 g)
- Crochet hook size N3 [This is likely a typo. A size 3 mm.]
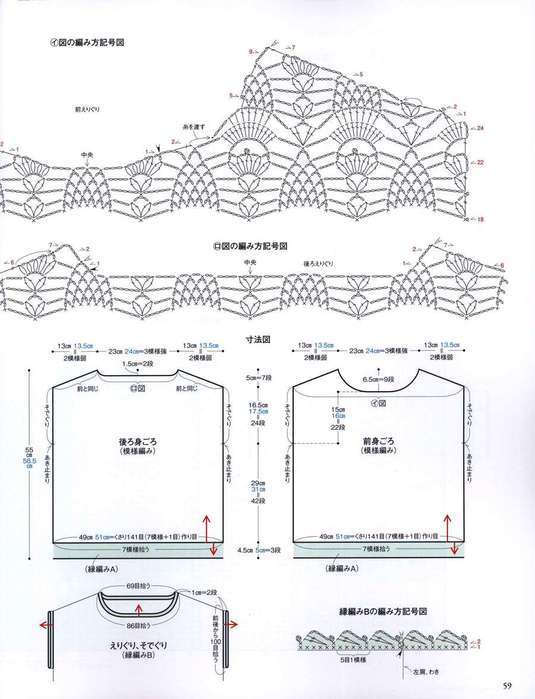
Pineapple Pattern:
- Number of stitches is a multiple of 30 + 4 + 3 turning chains.
- Work according to Chart 1.
- Each row begins with 1, 3, or 4 turning chains (instead of the first sc, dc, or tr) and with the stitches before the repeat, repeat the stitches of the repeat, and end with the stitches after the repeat.
- Work rows 1 through 21 once, then repeat rows 4 through 21.
Lace Pattern:
- Number of stitches is a multiple of 10 + 5 + 3 turning chains.
- Work according to Chart 2.
- Each row begins with 3 turning chains (instead of the first dc) and with the stitches before the repeat, repeat the stitches of the repeat, and end with the stitches after the repeat.
- Work rows 1 through 3 once, then repeat rows 2 and 3.
Border:
- *1 half double crochet (hdc) [US terms; htr in UK terms], 2 chain stitches, skip 2 stitches, 3 triple crochets (tr) [US terms; dtr in UK terms] in 1 base stitch, 2 chain stitches, skip 2 stitches; repeat from *, 1 slip stitch in the first hdc.
Gauge:
- Pineapple pattern: 32 stitches and 11 rows = 10 x 10 cm
- Lace pattern: 30 stitches and 10 rows = 10 x 10 cm
Back/Front:
- Chain 154 (184) + 3 turning chains and work in the pineapple pattern.
- After 53 cm from the starting edge, finish off.
Sleeves:
- Chain 65 (75) + 3 turning chains and work in the lace pattern.
- After the 1st row, there are 79 (91) stitches.
- Simultaneously, starting from the cast-on edge, increase for the sleeve shaping on both sides in every 2nd row 22 x 1 stitch = 123 (135) stitches, incorporating the added stitches into the pattern.
- After 46 cm from the starting edge, finish off.
Assembly:
- Sew the shoulder seams.
- Sew in the sleeves.
- Sew the side seams and sleeve seams.
- Work 1 row of the border around the bottom edges and the sleeve edges.
Stitch Key (Legend):
- o = 1 chain stitch (ch)
- I = 1 single crochet (sc) [US terms; dc in UK terms]
- † = 1 double crochet (dc) [US terms; tr in UK terms]
- ‡ = 1 triple crochet (tr) [US terms; dtr in UK terms]
- If the symbols are joined at the bottom, the stitches are worked into the same base stitch.