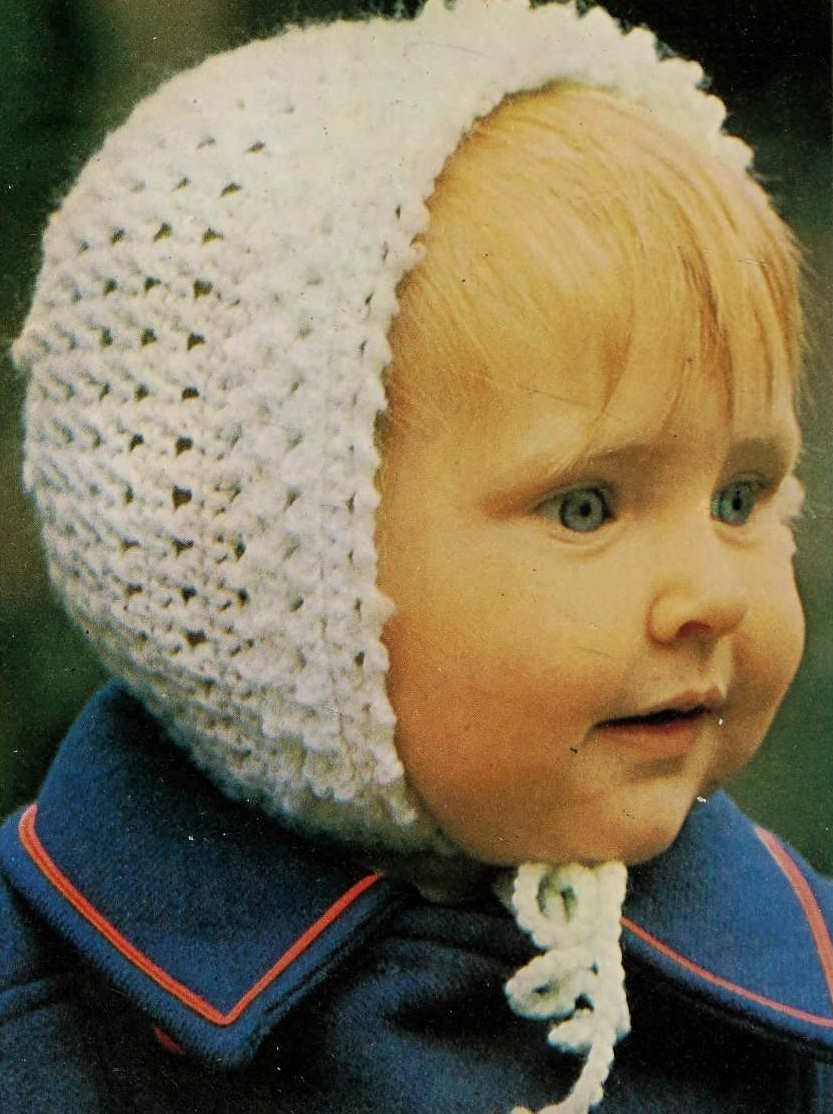
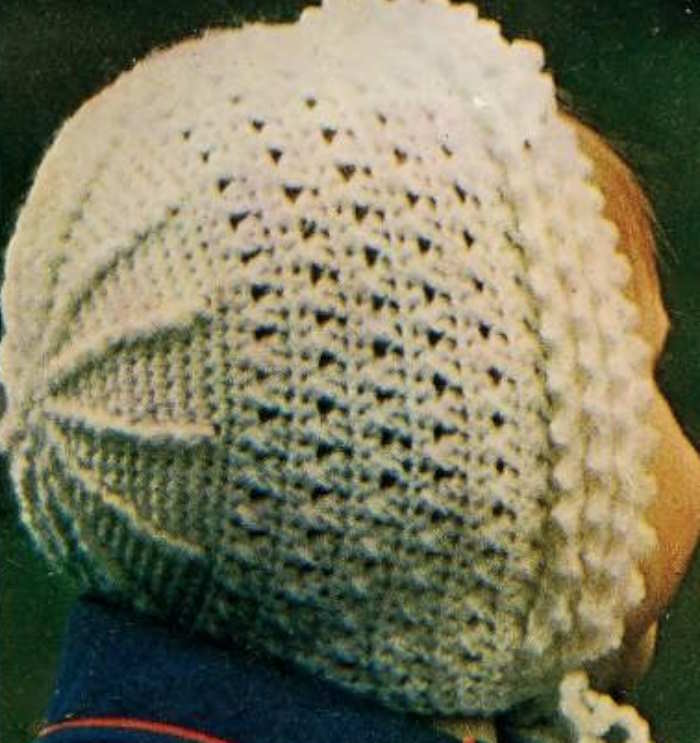
This vintage crochet pattern creates a baby bonnet with a textured stitch pattern, a folded brim, and crocheted ties. The bonnet is worked from the center back outwards in rounds, then shaped with rows, and finally finished with an edging and ties.
Skill Level: Due to the vintage instructions, textured stitches, and shaping, this pattern is best suited for an intermediate crocheter.
Baby Bonnet Crochet Pattern
Sizes:
- 13-inch width around brim (14½-inch width in brackets)
Gauge:
- 12 stitches and 13 rows = 2 inches in pattern stitch, using a Size 0 (1.75mm) steel crochet hook.
It is important to make a guage swatch to ensure your bonnet turns out the correct size.
Materials:
- 3 [3] ounces of Dawn Wintuk Baby Yarn (Fingering weight, often called “baby yarn”)
- One Size 0 [1.75mm] steel crochet hook
Abbreviations:
St = Stitch
Ch= Chain
Sl st= Slip Stitch
Sc= Single Crochet
Dc= Double Crochet
Rep= Repeat
Sk= Skip
Patt= Pattern
Roz= Ounce
Instructions:
Bonnet:
- Foundation Circle: Using Size 0 [1.75mm] hook, create a chain (number of chains not specified, but long enough to comfortably fit 12 dc – a chain of 3 or 4 is a good starting point). Join with a slip stitch (sl st) to the first chain to form a circle.
- Round 1: Chain 1 (counts as first dc), 11 dc into the circle. Join with a sl st to the top of the beginning chain-1. (12 dc total)
- Round 2: Chain 1 (counts as first sc), 1 dc around the front post of the first stitch from the previous round (this creates the first “raised dc”), * 1 sc into the next dc, 1 dc around the front post of the same dc (raised dc), repeat from * to end. Join with a sl st into the first chain-1. (12 raised dc with 1 sc between each)
- Round 3: Chain 1, 1 sc into the next raised dc, 1 raised dc into the same raised dc, * 1 sc into the next sc, 1 sc into the next raised dc, 1 raised dc into the same raised dc, repeat from * to end. Join with a sl st into the first chain-1.
- Round 4: Chain 1, * 1 sc into each sc up to the next raised dc, 1 raised dc into the next raised dc, repeat from * to end. Join with a sl st into the first chain-1.
- Rounds 5-7: Repeat Round 4 three more times. You should now have 6 sc between each raised dc, and 12 sections total.
- First Short Row: Chain 1, 1 sc into each stitch across 11 sections only. Turn.
- Second Short Row: Chain 1, sc into each sc over the 11 sections. Turn.
- Crossed Double Crochet Row: Chain 1, skip the first sc, * 1 dc into the next sc, 1 dc into the skipped sc (this is a “crossed dc”), repeat from * to the last stitch, 1 dc into the last stitch. Turn.
- Single Crochet Row: Chain 1, 1 sc into each dc to the end, 1 sc into the turning chain. Turn.
- Repeat Rows: Repeat the last two rows (Crossed DC Row and SC Row) 4 more times. Fasten off.
Finishing:
- Brim: Fold the last 4 rows of the bonnet onto the Right Side (RS) to form the brim.
- Lower Edging: Using Size 0 [1.75mm] hook, work 2 rows of sc along the lower edge of the bonnet, working through the double thickness of the brim.
- Brim Edging: Rejoin yarn to the first crossed dc row. Using Size 0 [1.75mm] hook:
- Row 1: * Chain 1, 1 sc into the first chain, 1 sc into the next stitch, repeat from * to end. Turn.
- Row 2: Into the sc row, * chain 1, 1 sc into the first chain, skip the next stitch, 1 sc into the next stitch, repeat from * to end. Turn.
- Row 3: Repeat Row 2 once more. Fasten off.
- Ties: Using Size 0 [1.75mm] hook and double strand of yarn, make a chain of 70 stitches on each side of the bonnet for ties. Sew in all ends securely.
Key Points and Clarifications:
- Front Post Double Crochet (Raised DC): This stitch is worked around the post of the double crochet from the previous row, rather than into the top loops. It creates a raised, textured effect.
- Crossed Double Crochet: This stitch adds a decorative element. The order of the stitches is important: you work into the second stitch, then back into the skipped stitch.
- Double Strand for Ties: Using a double strand of yarn makes the ties stronger and less likely to stretch out.
- It is important to maintain a consistent tension throughout.