Calling all crocheters! Get ready to create your own backyard oasis with this simple yet stunning hammock pattern. This project uses durable dacron or nylon seine twine to craft a large, rectangular hammock that’s perfect for lounging. It employs a simple, repeating double crochet and chain stitch pattern, which make this an ideal project for crocheters who enjoy projects that work up quickly and meditate with familiar stitches. You will need to add spreader bars, which will give your finished piece structure and support.
This hammock design is surprisingly straightforward, even with its impressive finished size. After you’ve crocheted the main body, you’ll add sturdy strands to each end and attach them to spreader bars (made from hardwood) for support. The strands are then gathered and secured with a series of decorative square knots before being looped through strong metal rings for hanging. Detailed instructions and an illustration guide you through this crucial finishing step. The result is a strong, stylish, and most importantly, comfortable hammock that’s ready for those lazy summer days.
This pattern creates a simple, rectangular hammock using double crochet stitches and chains. It’s designed for comfort and uses durable dacron or nylon cord.
Materials:
- Seven 1-pound rolls of white nylon or dacron seine twine, size 36. (Approximately 1,080 yards for the hammock body, plus one additional roll for the ends/strands). Note: Seine twine is a strong, twisted cord often used in fishing and boating.
- Two rings, 3 inches in diameter (metal or strong plastic)
- Eight feet of 1-by-2-inch hardwood (for two spreader bars)
- Epoxy or strong fabric glue
- Size J (6.0 mm) aluminum crochet hook (or size needed to achieve gauge)
- Drill (with a bit appropriate for the cord thickness – likely around 1/4 inch, but test)
- Sandpaper (various grits)
- Wood stain and varnish, or paint (optional)
- Measuring Tape
- Pencil
- Scissors
Gauge:
- 1 double crochet and 3 chains = 1 inch (This means 1 dc, ch2, 1dc = 1 inch)
- 1 row = 1 inch
- It’s crucial to check your gauge. If your gauge is off, the hammock will be a different size, and you may run out of cord.
Main Stitch: Double Crochet (dc)
Finished Size: Approximately 3 feet by 8 feet (including stretch, if using nylon)

Instructions:
Hammock Body:
- Foundation Chain: Make a chain approximately 38 inches long. The number of chains must be divisible by 4. (To achieve approximately 38 inches with the given given gauge of 4 stitches per inch (1dc, ch2, 1dc), you’ll need around (38 inches * 4 sts/inch) = 152 chains. Adjust this number if your gauge differs.)
- Row 1: Double crochet (dc) in the 5th chain from the hook, * chain 2, skip 2 chains, dc in the next 2 chains. Repeat from * across, ending with 2 dc in the last 2 chains. Chain 3 (counts as a dc), turn.
- Row 2: Dc in the next stitch, * chain 2, skip 2 stitches, dc in the next 2 stitches. Repeat from * across, ending with dc in the last stitch and dc in the top of the chain-3 from the previous row. Chain 3 (counts as a dc), turn.
- Row 3 to End: Repeat Row 2 until the hammock is approximately 7 feet long. (If using nylon cord, remember it will stretch about a foot when in use, so you might make it slightly shorter).
- Joining New Cord: When joining a new roll of cord, connect with a square knot. Secure the knot by reinforcing it with glue, or (if using nylon) melt the cord slightly to fuse the two ends together.
Making the Spreader Bars:
- Cut: Cut two pieces of hardwood 45 inches long.
- Sand: Sand the wood smooth, and slightly round the ends if desired.
- Drill Holes:
- Find the center of each board and mark it. This is where the first hole will be.
- Measure 4 1/2 inches to the left and right of the center mark and mark for holes.
- Continue measuring and marking 4 1/2 inches apart, creating 3 more holes on each side of the center hole. You should have a total of 9 evenly spaced holes.
- Drill holes at each marked spot. The hole size should be large enough for the cord to pass through easily, but not so large that the knot will slip through.
- Finish: Finish the hardwood with stain and varnish, or with paint, as desired.
Forming the Strands (Cords):
- Attach Cord: Attach the last roll of cord to the end of the last row of the hammock with a slip stitch (sl st).
- Create Chains: Single crochet (sc) in the next stitch. Then, chain until the chain is approximately 54 inches long.
- End Off: End off the chain, leaving about 4 feet of extra cord for final wrapping.
- Repeat Across Ends: Continue across both ends of the hammock, attaching a 54-inch chain to every 4th set of 2 dc’s.
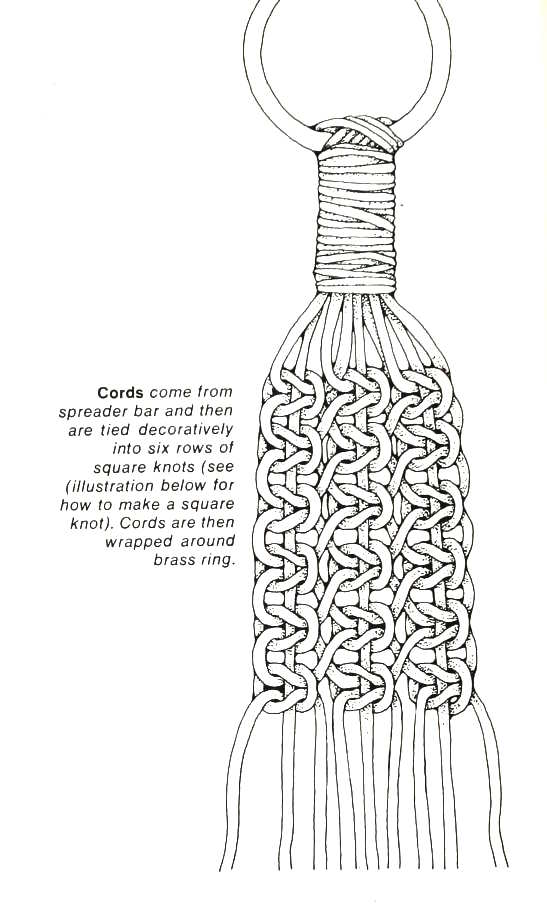
Finishing the Ends (Attaching to Spreader Bars and Rings):
- Thread Through Holes: Pull each 54-inch chain through the corresponding hole in the spreader bar.
- Knot at Spreader: Tie a secure overhand knot in the chain close to the outside of each hole. This prevents the chain from slipping back through.
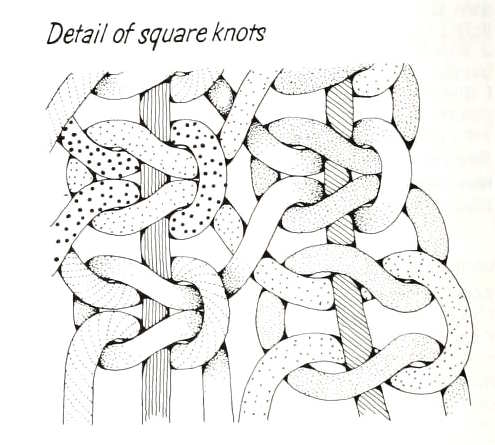
- Square Knots (One End at a Time): Work on one end of the hammock at a time.
- With tension, pull all cords together at a point approximately 30 inches above the center of the spreader bar.
- Row 1: Using 3 cords at a time, tie a row of square knots. Ensure all cords are evenly taut.
- Row 2: For the next row of knots, crisscross the cords (as shown in a diagram, if available – basically, take the outer cords and bring them to the center, and the center cords out). Tie another row of square knots, again using 3 cords for each knot.
- Rows 3-6: Continue in the same manner (crisscrossing cords) until 6 rows of square knots have been completed.
- Transition to Cord (No Chains): Approximately 1 inch above the square knots, make sure all chains stop and only the plain cord continues. You will be working with the lengths of cord, not lengths of chain, for the final steps.
- Attach Ring:
- With every other cord, loop the cord through the ring.
- Tie the looped cord to the next cord using a square knot.
- With the last cord, tie a square knot using the last three cords.
- Apply epoxy or strong glue to these knots to prevent them from coming loose.
- Wrap and Secure:
- Cut 6 of the cords short (these were used for the knots attaching to the ring).
- With the remaining 3 long cords, wrap tightly around and around the knotted area, looping the cords through the ring a couple of times for added strength.
- Tie the ends of the wrapping cords securely and cut them short.
- Apply glue to the final knots to secure them.
- Repeat for Other End: Repeat steps 3-6 for the other end of the hammock.
Square Knot Instructions (Basic):
- Take two cords (or groups of cords).
- Pass the right cord over the left cord, then under.
- Pass the left cord over the right cord, then under.
- Tighten the knot.