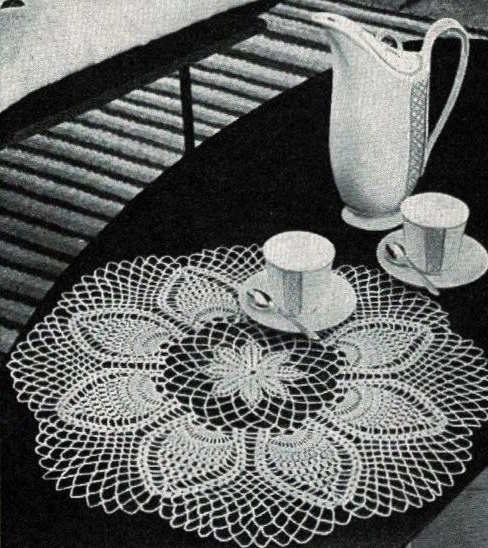
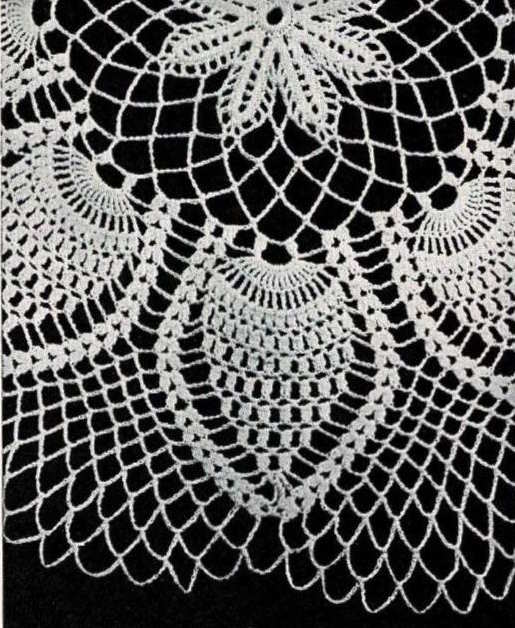
Get ready to create a stunning, vintage-inspired doily with this intricate crochet pattern! This project uses fine Coats Mercer-Crochet thread (size 20) and a small steel hook to achieve its delicate, lacy appearance. The design begins with a clever technique using multiple strands of thread to create a sturdy, textured center. This is immediately worked into, to then create a beautiful starburst of petals, setting the stage for the expanding pineapple motifs that define the rest of the piece.
From there, the doily grows outwards in a series of rounds, each building upon the last with a captivating combination of shells, clusters, and chain spaces. The pattern gradually introduces the iconic pineapple shapes, which become increasingly prominent as you progress. The instructions carefully guide you through each step, ensuring that even complex-looking sections are manageable. The finished doily, with its delicate balance of openwork and textured stitches, makes a beautiful addition to any home.
Materials:
- Coats Mercer-Crochet No. 20 (20 Gram) – 2 balls. (The original pattern calls for color 442, Mid Buttercup, but any color can be used). Note: This is a very fine crochet thread, similar to a modern size 10 crochet thread.
- Milwards Steel Crochet Hook No. 3 (This is equivalent to a modern US size 10 / 1.3 mm steel crochet hook)
- 8 strands of thread, each 1 yard long (for the center)
- Starch (for blocking – optional)
- Pins (for blocking)
Gauge:
- First 3 rows = 3 inches in diameter. Checking your gauge is very important with fine thread, as small differences can significantly impact the finished size.
Finished Measurement: 16 inches in diameter
Abbreviations:
St = Stitch
Ch= Chain
Ss = Slip Stitch (same as modern sl st)
Sc = Single Crochet
Hdc= Half Double Crochet
Dc = Double Crochet
Tr = Treble Crochet
Hlf Tr = Half Treble Crochet (This is the same as a modern US Half Double Crochet – hdc)
Dbl Tr = Double Treble Crochet (This is the same as a modern US Treble Crochet – tr)
Trip Tr = Triple Treble Crochet (This is the same as a modern US Double Treble Crochet – dtr)
Rep = Repeat
Sk = Skip
Sp = Space
Lp(s) = Loop(s)
Beg = Beginning
Cluster = see instructions
Shell = see instructions
Notes on Vintage Terminology:
- “Miss” = Skip: The instruction “miss 1 ch” means “skip 1 chain.”
- Half Treble (hlf tr): This is the same as a modern US half double crochet (hdc). Yarn over, insert hook, yarn over, pull through, yarn over, pull through all loops on hook.
- Double Treble (dbl tr): Is a Treble Crochet (tr).
- Triple Treble (trip tr): Is a Double Treble Crochet (dtr).
- Working Over Strands: The first few rows are worked over the 8 strands of thread. This creates a firm, padded center for the doily.
- Joint [Stitch]: This means to work two stitches together, leaving the last loop of each on the hook, then yarn over and draw through all loops.
Instructions:
- Foundation Ring: Cut 8 strands of thread, each one yard long. With working thread, chain 10, join with a slip stitch (ss) to form a ring.
- Row 1: Working over the 8 strands, work 24 dc into the ring, 1 ss into the first dc. Drop the strands (you will pick them up again in Row 3).
- Row 2: * Chain 17, 1 hdc (half treble) into the 6th chain from the hook, (chain 1, skip 1 chain, 1 tr (treble) into the next chain) 4 times, chain 1, skip 1 chain, 1 hdc (half treble) into the next chain, chain 1, 1 dc into each of the next 3 dc; repeat from * ending with 1 ss into the base of the first chain-17. (8 petals formed)
- Row 3: Working over the 8 strands again, work 2 dc into each of the next 6 spaces, 7 dc into the next space, 2 dc into each of the next 6 spaces, skip 1 dc, 1 dc into the next dc; repeat from * all around. Fasten off the 8 strands (securely weave them in).
- Row 4: 1 ss into each of the next 4 dc, chain 4, skip 1 dc, 1 tr (treble) into the next dc, * (chain 2, skip 1 dc, 1 tr into the next dc) 5 times, into the same place as the last tr work (chain 2, 1 tr) twice (this forms the tip of the petal), (chain 2, skip 1 dc, 1 tr into the next dc) 5 times, skip the next dc, 1 joint tr (work a tr into the next dc and into the corresponding dc of the next petal, leaving the last loop of each on the hook, yarn over and draw through all loops on hook); repeat from *, omitting the 1 joint tr at the end of the last repeat, 1 ss into the 4th chain of the beginning chain-4. Fasten off.
- Row 5: Attach thread to the first space of the 2 spaces at the tip of any petal, 1 dc into the same space, * chain 5, 1 dc into the next space, chain 10, skip 2 spaces, make a joint tr (work a tr into the next space and into the corresponding space on the next petal), chain 10, skip 2 spaces on the same petal, 1 dc into the next space; repeat from * ending with chain 5, 1 dtr (triple treble) into the first dc.
- Rows 6, 7, and 8: * Chain 10, 1 dc into the next loop; repeat from * ending with chain 5, 1 dtr (triple treble) into the dtr of the previous row.
- Row 9: Chain 3, 2 tr into the loop just made, leaving the last loop of each on the hook, yarn over and draw through all loops on the hook (a starting cluster made), chain 3, a 3-tr cluster into the same loop (shell made), * chain 5, into the next loop work a 3-tr cluster, chain 7, and a 3-tr cluster, (chain 5, into the next loop work a 3-tr cluster, chain 3, and a 3-tr cluster) twice; repeating from * ending with chain 5, into the next loop work a 3-tr cluster, chain 7, and a 3-tr cluster, chain 5, into the next loop work a 3-tr cluster, chain 3, and a 3-tr cluster, chain 5, 1 ss into the top of the first cluster. (8 pineapples started).
- 3-tr Cluster: (Yarn over, insert hook into the designated space, yarn over, pull through, yarn over, pull through 2 loops) 3 times, yarn over, pull through all loops on hook.
- Shell: 3-tr cluster, chain 3, 3-tr cluster (all in the same space).
- Row 10: 1 ss into the next space, chain 3 and complete a starting cluster, chain 3, a 3-tr cluster into the same space (shell made over shell), * chain 1, skip the next space, 15 tr (double treble) into the next space, chain 1, shell over the next shell, chain 5, shell over the next shell; repeat from * omitting a shell at the end of the last repeat, 1 ss into the top of the first cluster.
- Row 11: 1 ss into the next space, * shell over shell, (chain 1, 1 tr (double treble) into the next tr) 15 times, chain 1, shell over shell, chain 5; repeat from * ending with 1 ss into the top of the first cluster.
- Row 12: 1 ss into the next space, * shell over shell, (chain 2, skip the next tr, a 3-tr cluster into the next space) 14 times, chain 2, shell over shell, chain 5; repeat from * ending with 1 ss into the top of the first cluster.
- Row 13: 1 ss into the next space, * shell over shell, (chain 3, skip the next cluster, 1 dc into the next space) 13 times, chain 3, shell over shell, chain 5; repeat from * ending with 1 ss into the top of the first cluster.
- Row 14: 1 ss into the next space, * shell over shell, chain 4, skip the next space, a 3-tr cluster into the next loop, (chain 2, a 3-tr cluster into the next loop) 11 times, chain 4, shell over shell, chain 5; repeat from * ending with 1 ss into the top of the first cluster.
- Row 15: 1 ss into the next space, * shell over shell, chain 4, skip the next space, 1 dc into the next space, (chain 3, 1 dc into the next space) 10 times, chain 4, shell over shell, chain 5; repeat from * ending with 1 ss into the top of the first cluster.
- Row 16: 1 ss into the next space, * shell over shell, chain 4, skip the next space, a 3-tr cluster into the next loop, (chain 2, a 3-tr cluster into the next loop) 9 times, chain 4, shell over shell, chain 5; repeat from * ending with 1 ss into the top of the first cluster.
- Row 17: 1 ss into the next space, * shell over shell, chain 4, skip the next space, 1 dc into the next space, (chain 3, 1 dc into the next space) 8 times, chain 4, shell over shell, chain 5, 1 dc into the next space, chain 5; repeat from * ending with 1 ss into the top of the first cluster.
- Row 18: 1 ss into the next space, * shell over shell, chain 4, skip the next space, a 3-tr cluster into the next loop, (chain 3, a 3-tr cluster into the next loop) 7 times, chain 4, shell over shell, (chain 5, 1 dc into the next loop) twice, chain 5; repeat from * ending with 1 ss into the top of the first cluster.
- Continue Pattern: Continue in this manner, having 1 loop more on each row between the pineapples, making chain-6 loops on the 21st row, and 1 chain more on each loop on each row thereafter (at the same time, there should be two 3-ch loops less on each pineapple on each 3-ch row of pineapples) until 24 rows have been completed (2 clusters at the top of each pineapple on the 24th row).
- Row 25: 1 ss into the next space, * shell over shell, chain 4, skip the next space, into the next space work 1 dc, chain 3, and 1 dc, chain 4, shell over shell, (chain 10, 1 dc into the next loop) 9 times, chain 10; repeat from * ending with 1 ss into the top of the first cluster.
- Row 26: 1 ss into the next space, * shell over shell, chain 4, skip the next space, 1 dc into the next loop, chain 4, a 3-tr cluster into the space of the next shell, chain 1, 1 ss back into the space of the previous shell, chain 1, a 3-tr cluster into the same space as the last cluster, (chain 10, 1 dc into the next loop) 10 times, chain 10; repeat from * ending with chain 5, 1 dtr (triple treble) into the top of the first cluster.
- Row 27: * Chain 10, 1 dc into the next loop; repeat from * ending with chain 10, 1 ss into the top of the dtr. Fasten off.
Finishing:
- Weave in Ends: Weave in all loose ends securely.
- Starch (Optional): Starch the doily lightly. This helps it hold its shape and gives it a crisp finish. There are various methods for starching; you can use a commercial spray starch or make your own (cornstarch and water).
- Blocking: Pin the doily out to the correct measurement (16 inches in diameter) on a blocking board or padded surface. Make sure to pin it evenly, stretching it gently to open up the lace pattern. Let it dry completely before removing the pins.